
The transition to electric vehicles (EVs) is picking up pace, and with it comes the need for reliable and user-friendly charging solutions. The GO TO-U app has been developed specifically for EV drivers who seek confidence, comfort, and simplicity during their charging experiences. We are committed to continually enhancing our existing features and augmenting our product with new, beneficial functionalities. To facilitate your familiarization with the app and ensure its straightforward use, we present this comprehensive guide to the app's key features.
Searching for a Charging Station, Filtering, and Map Navigation
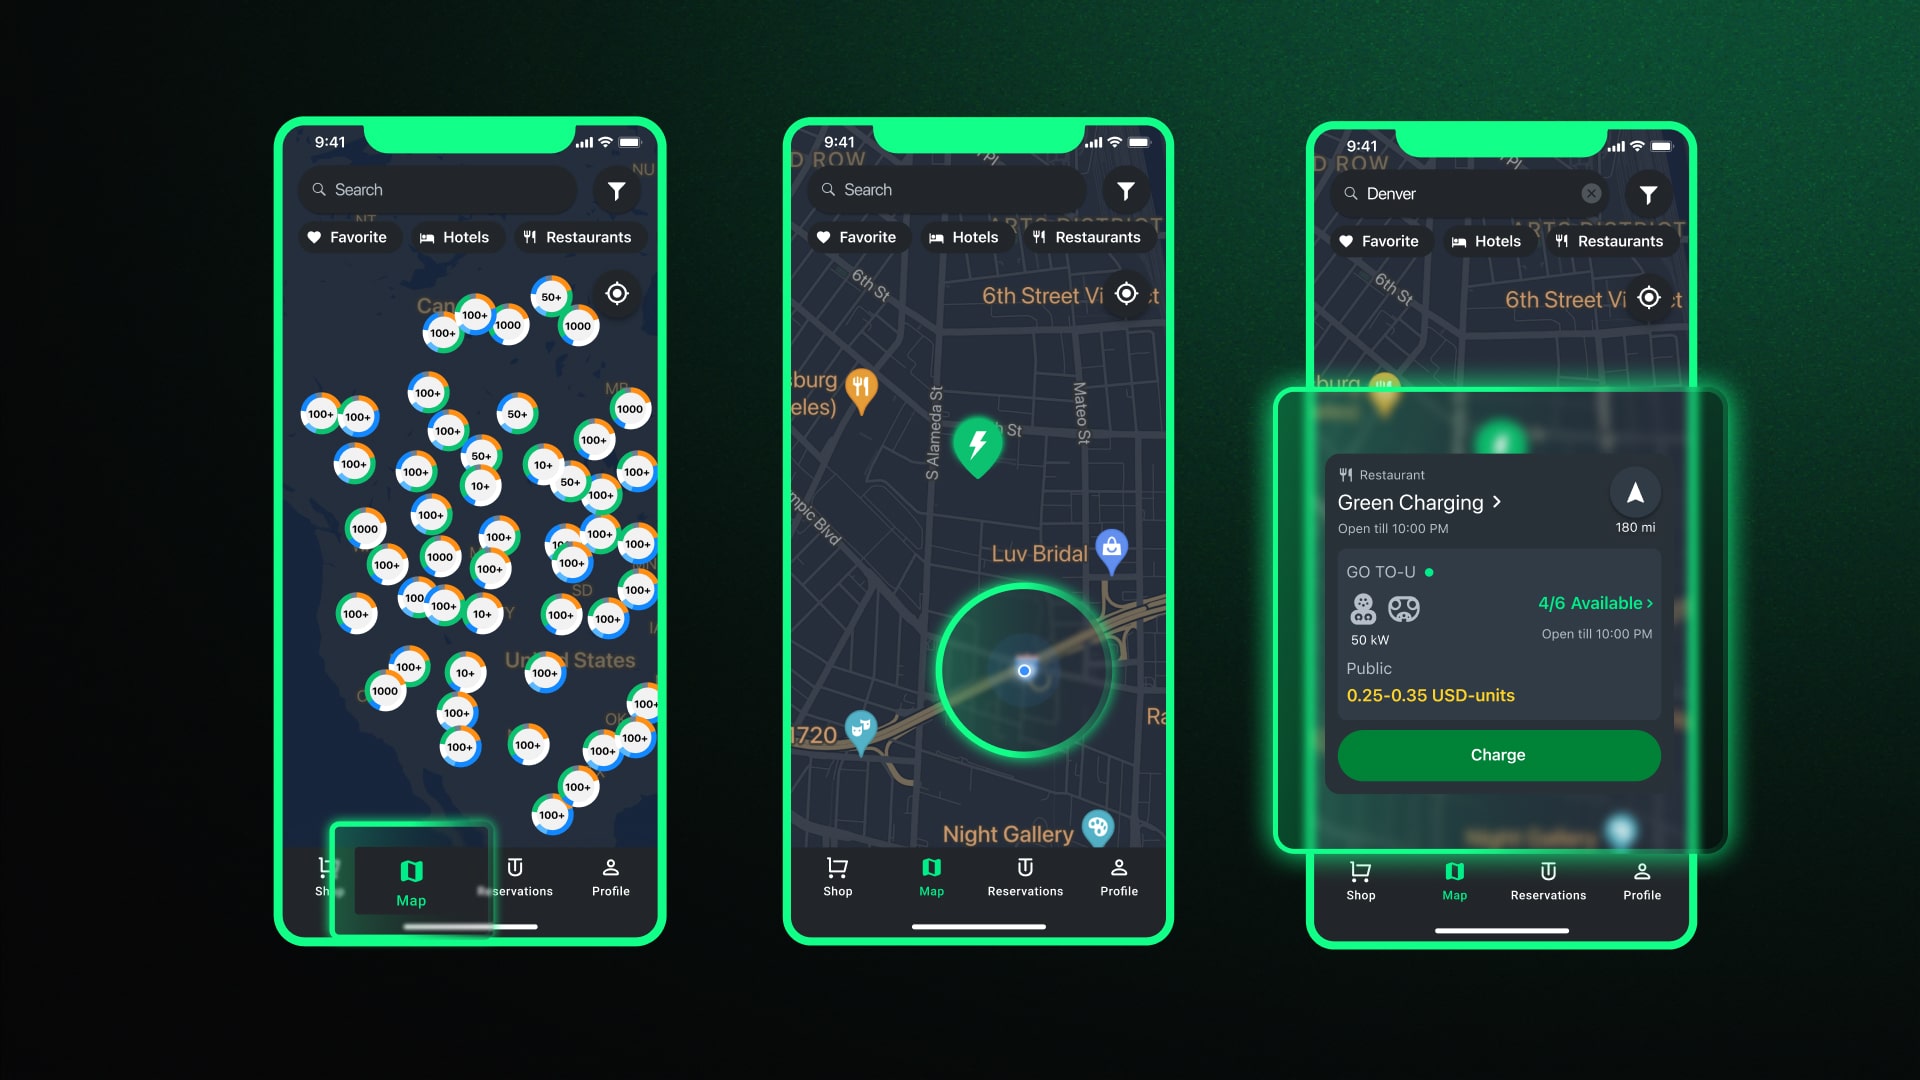
How to Find the Necessary Charging Station on the Map?
- On the main screen, the 'Map' tab opens automatically. If the app settings allow the use of geolocation, your current location will be displayed right away. You can choose the charging station that is nearest to you. If the station you need is located somewhere else, simply move the map to explore other regions, countries, provinces, or cities.
- For a more detailed view, you can zoom in or out using the touchpad. Pinch your fingers towards each other to zoom in or move them apart to zoom out.
- As soon as you have selected the required charging station, just proceed to its location on the map to get more information or directions on how to get there.
Note: You can also perform a search by entering the name of the location in the search window.
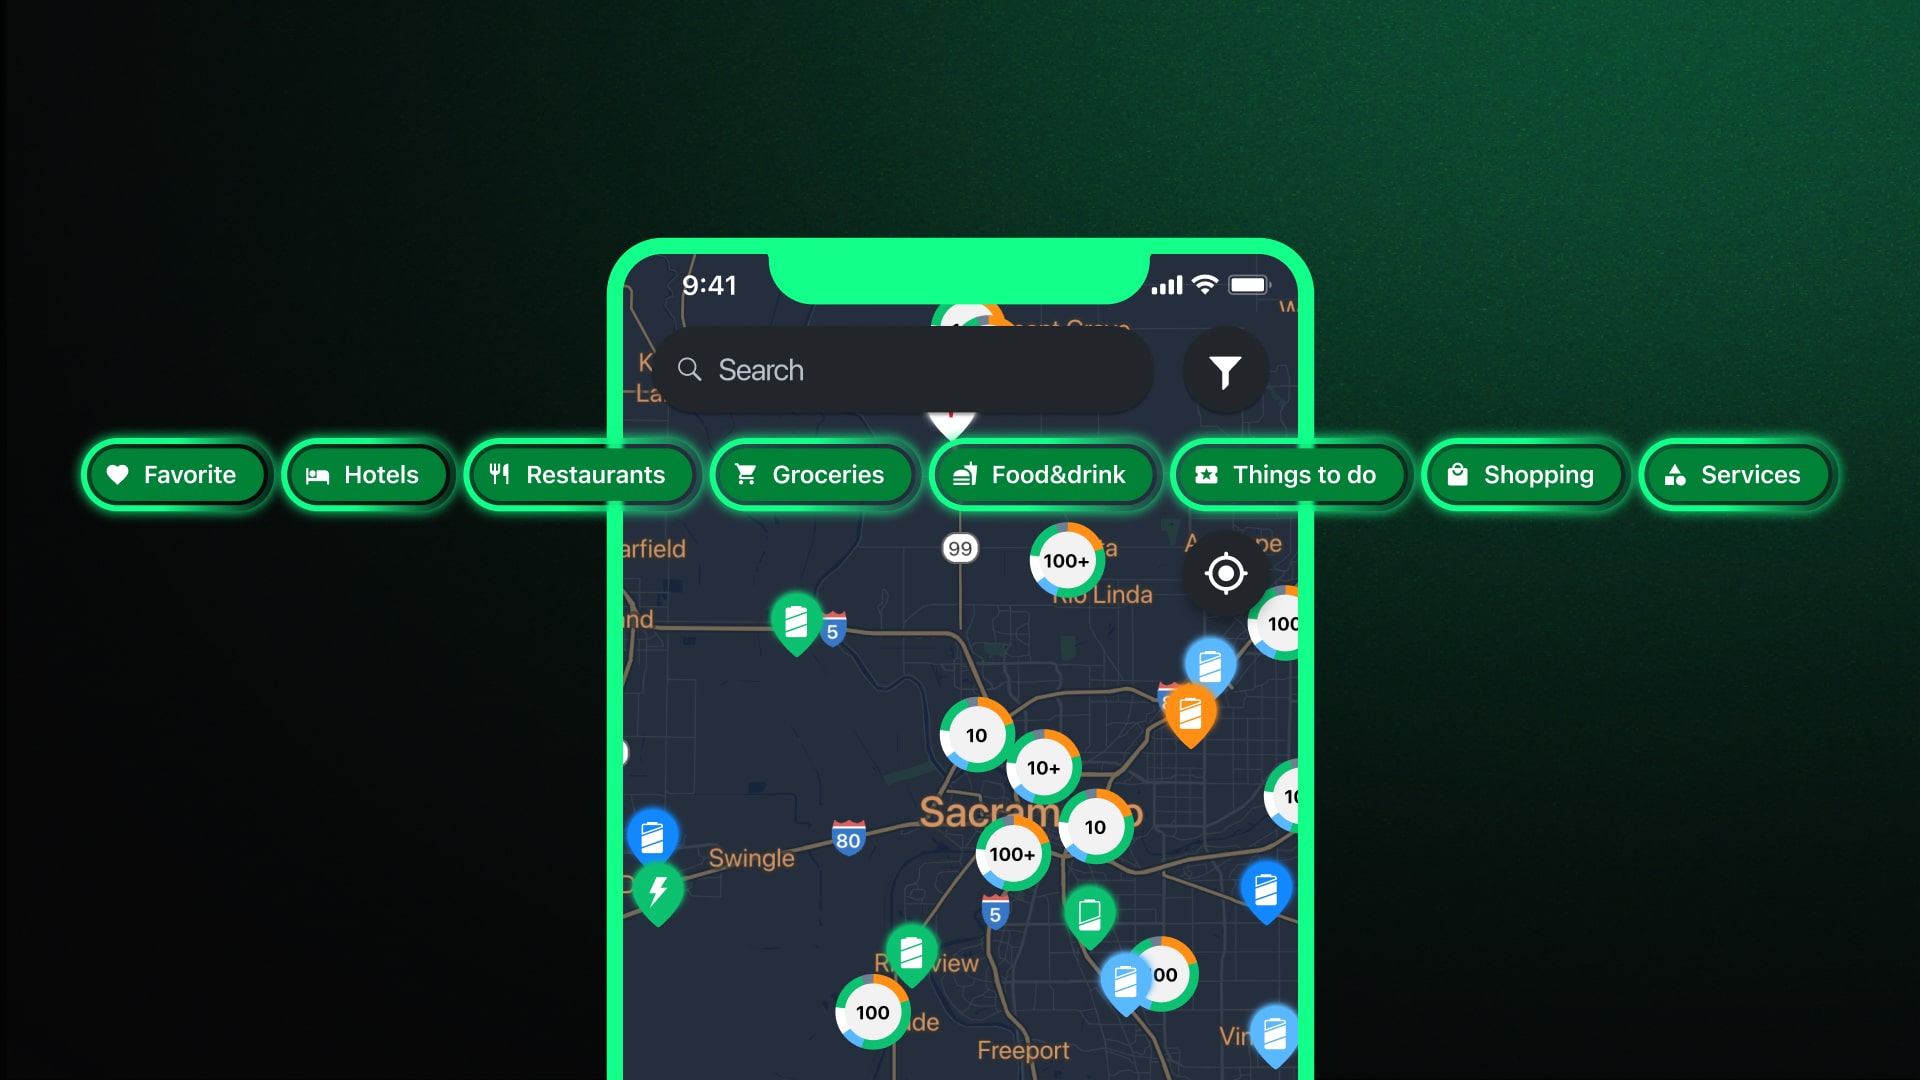
How to Filter Charging Stations by Type of Infrastructure?
- On the main screen, navigate to the "Map" tab, which is displayed by default when entering the app. At the top, just below the search window, select the necessary infrastructure object from the options provided, such as "Hotels", "Restaurants", "Groceries", etc.
- After that, select the required type of object.
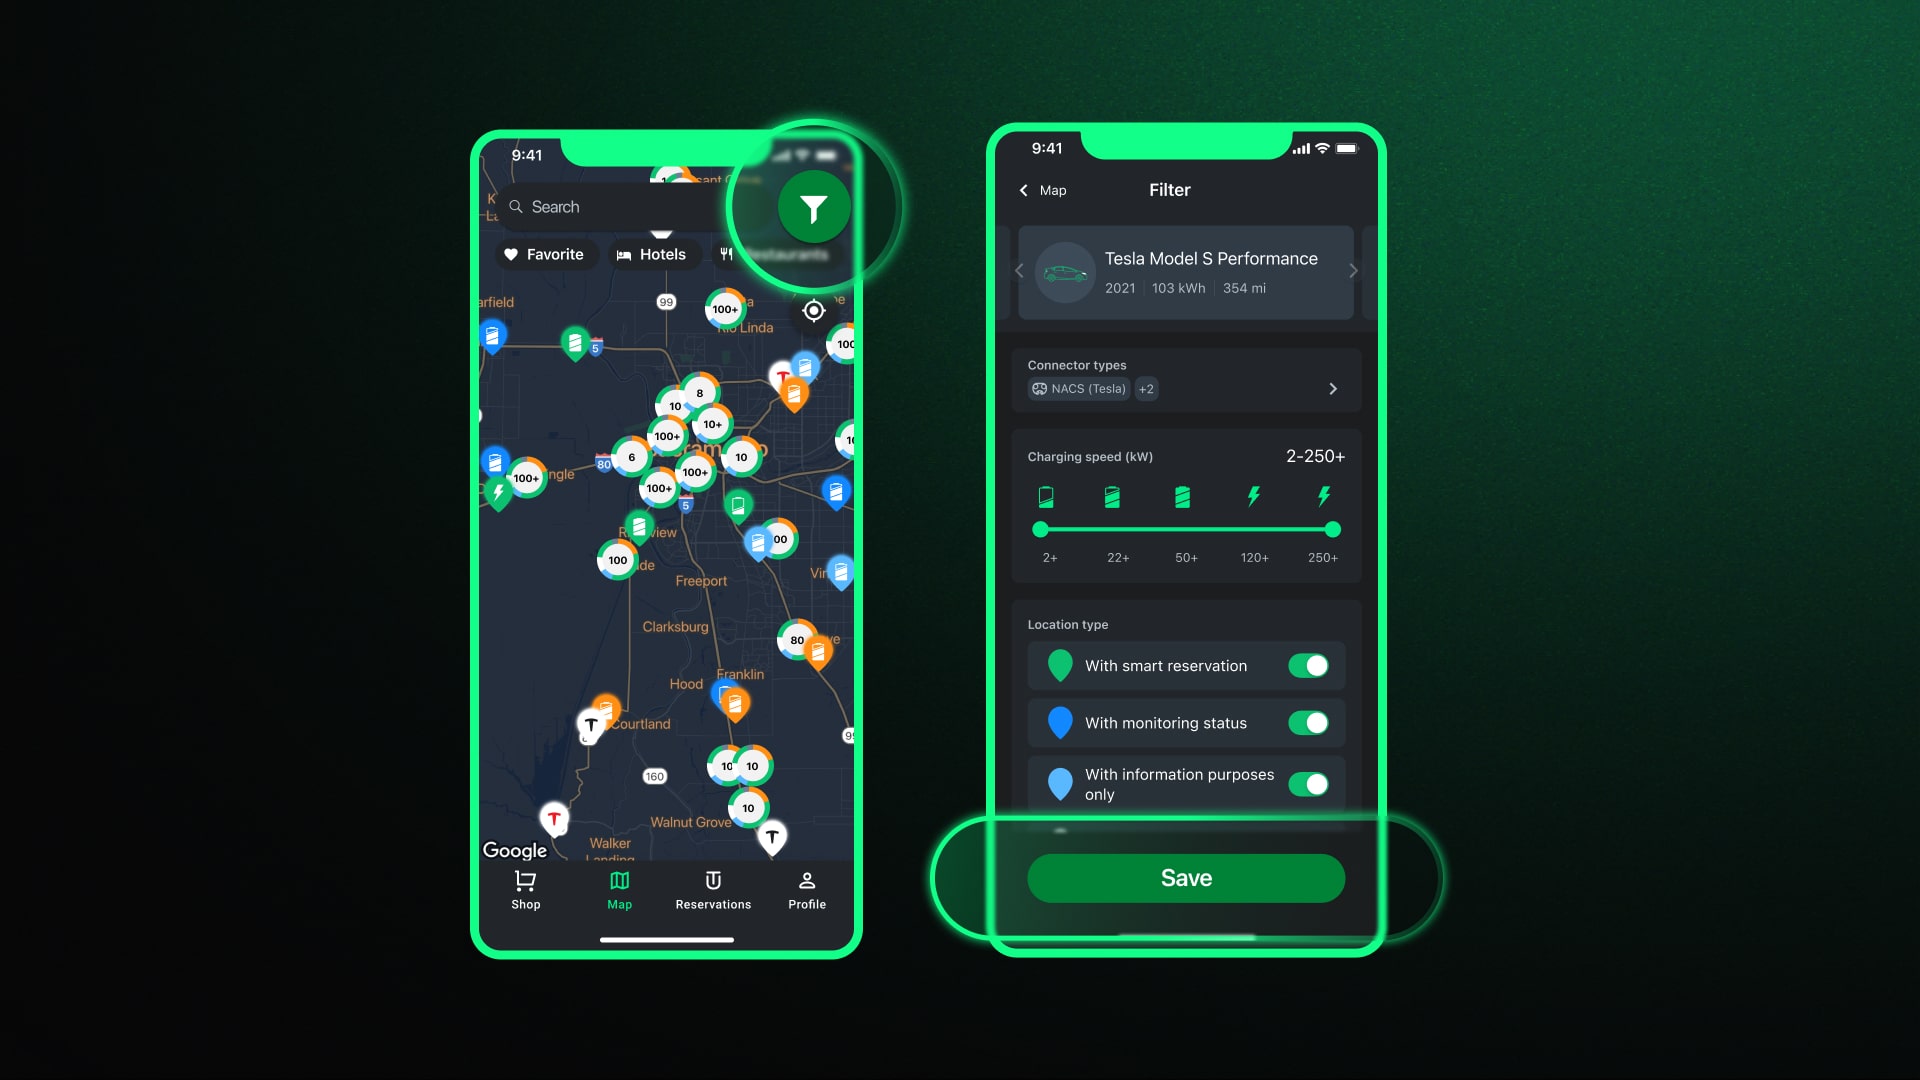
How to Filter Charging Stations by Operator, Connector Type, Power, etc.?
- On the main screen, open the "Map" tab, which is available by default when entering the app. At the top of the screen, to the right of the search window, click on the "Filters" icon.
- Choose the required filter, make changes, and then click "Apply" and/or "Save", depending on the action performed.
Note: The filter for the operator is located in the "Network" tab (just under "Types of Locations"), the filter for the connector type is in the "Charging Ports" tab (first in the list). The power filter is labeled "Charging Speed (kW)" and is represented as a slider.
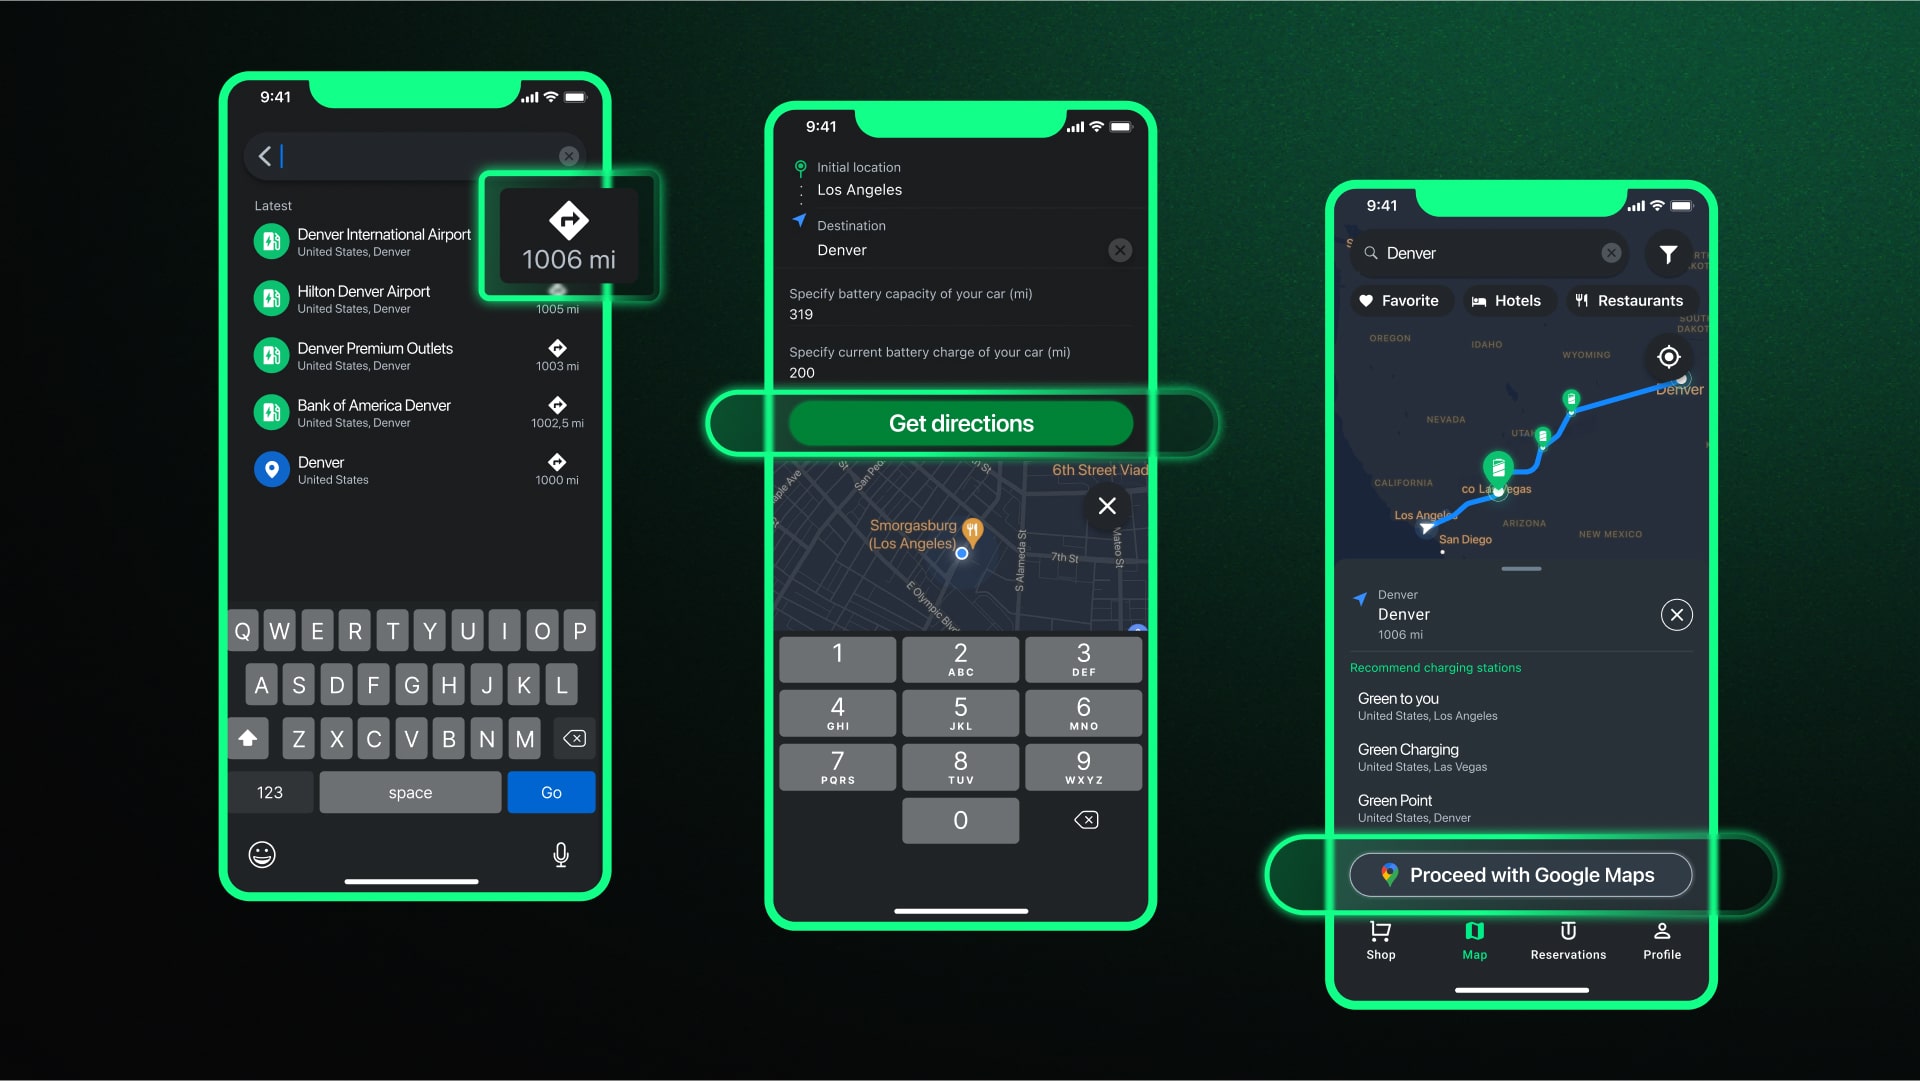
How to Plot a Route to a Charging Station?
Our app includes a smart route planner, which not only allows plotting a route from point A to point B but also recommends charging stations according to the characteristics of your vehicle and the current battery charge level. To use this feature:
- In the search window on the "Map" tab, enter the name of the locality.
- Enter data about the car's battery capacity (1st line) and current charge level (2nd line).
- Press the “Route” button.
Alternatively, you can use external maps on your smartphone, such as Google Maps, Waze, Apple Maps, but they do not provide detailed consumption costs like the smart planner.
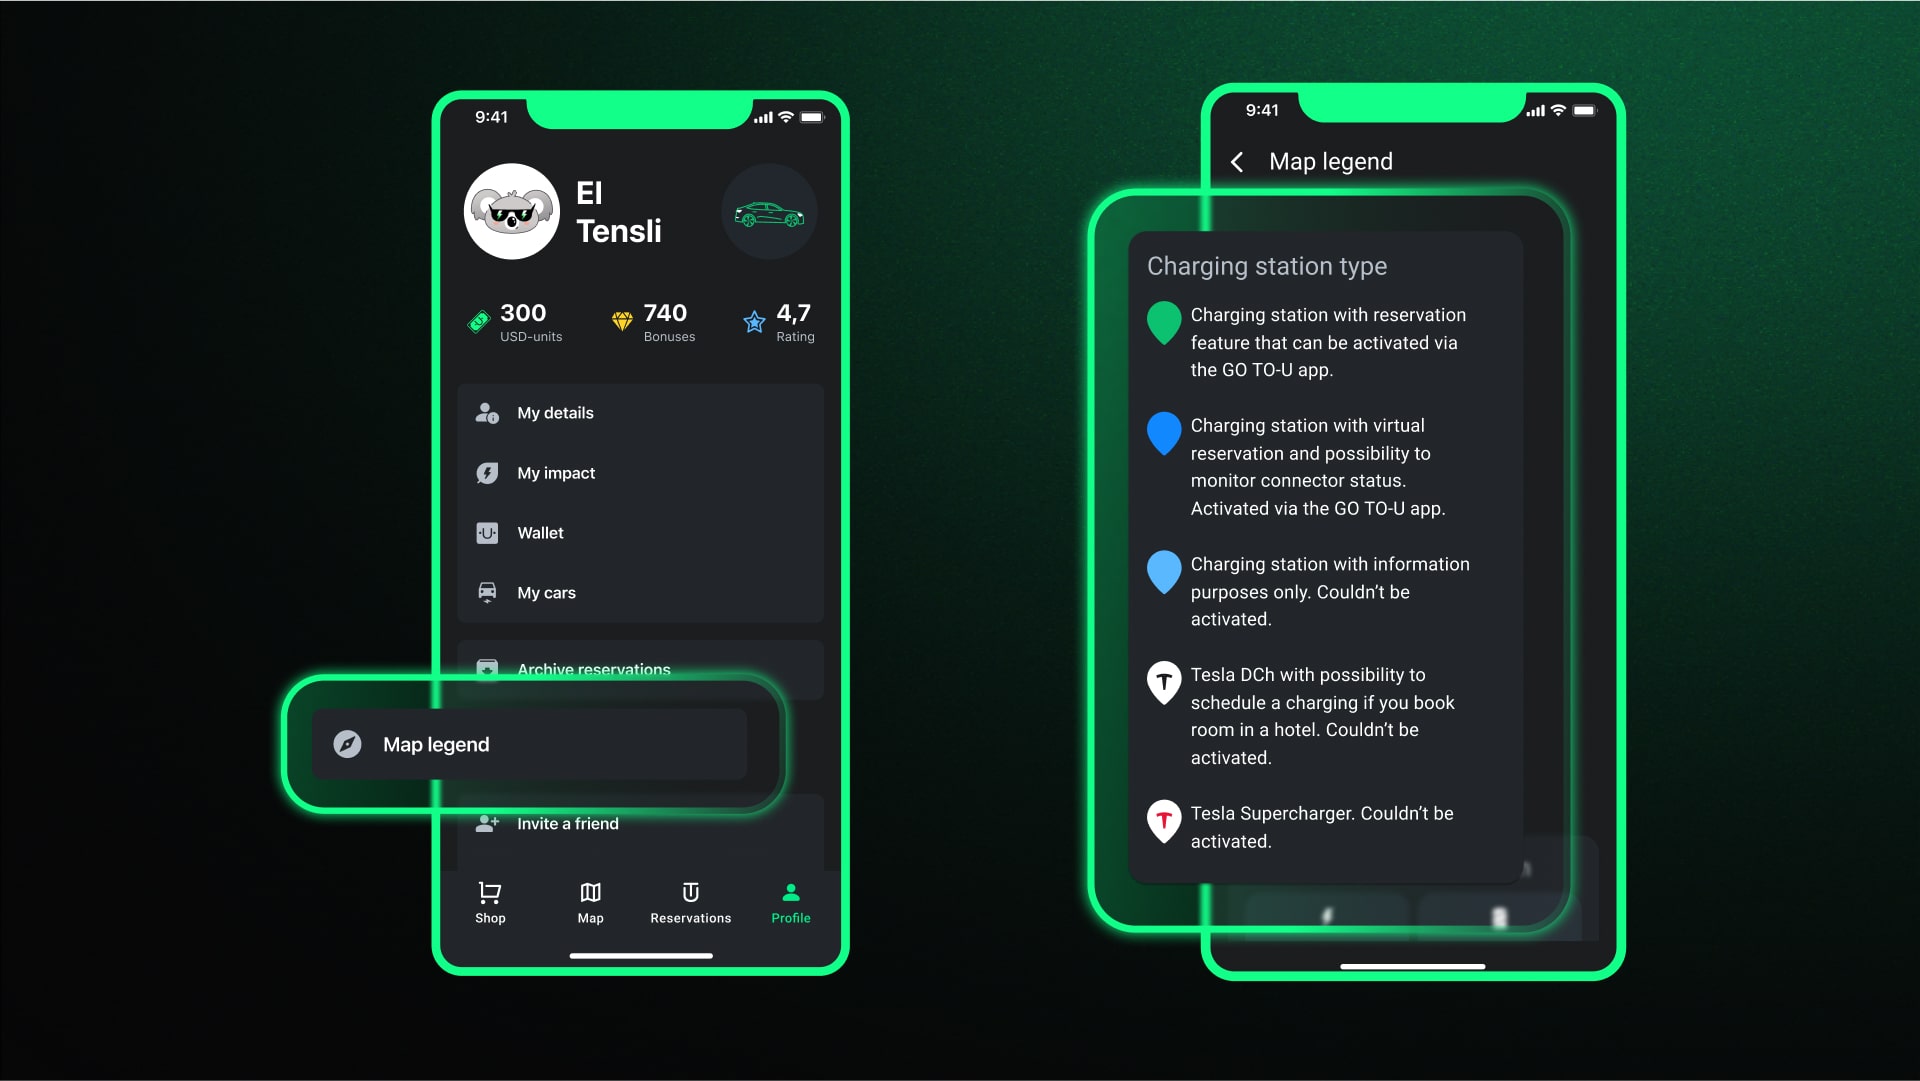
Where Can I See the Map Legend?
- Open the "Profile" tab on the main screen.
- Press the "Map Legend" button.
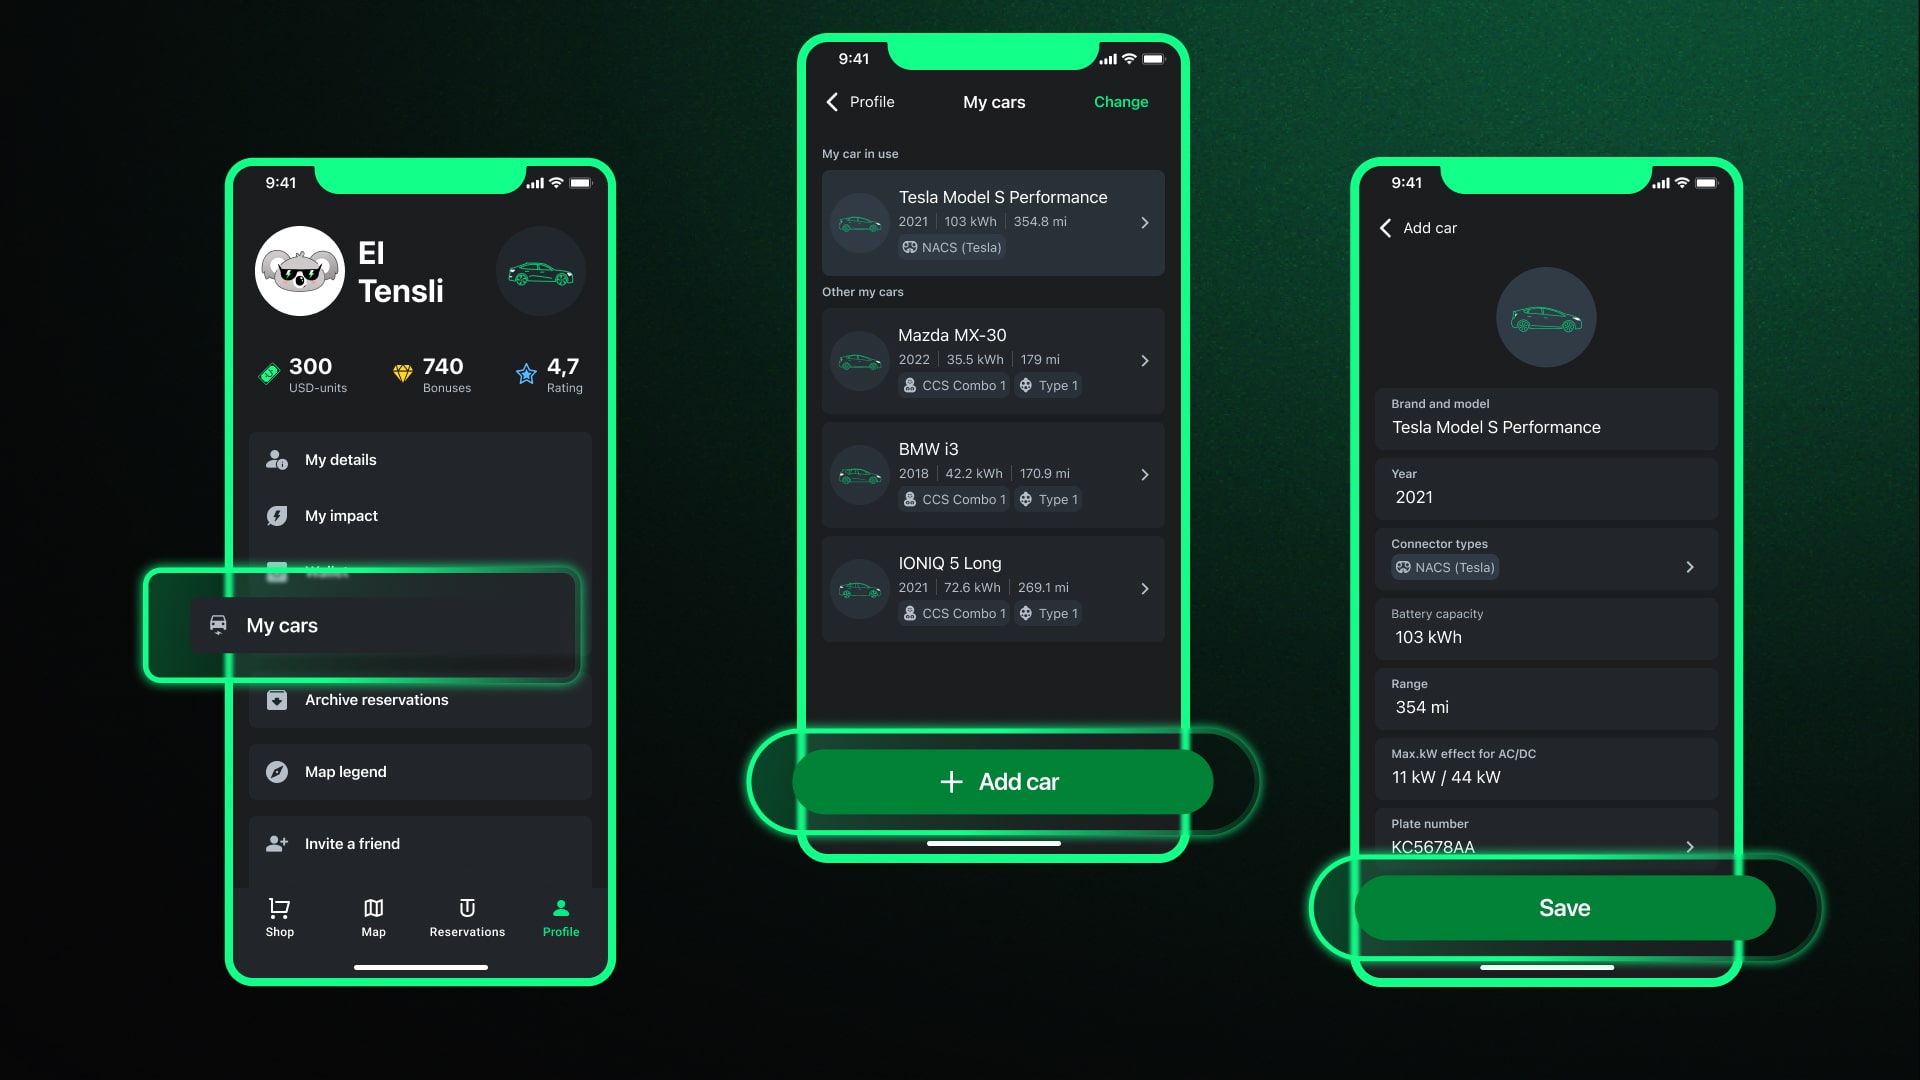
How to Add My New Car?
- On the main screen, at the bottom, press the “Profile” tab.
- In the profile tab, select the “My Cars” tab (fourth from the top).
- Press the "Add Car" button.
- Рerform all further actions proposed by the configurator, and add the car.
Note: If you did not find your electric car model, don't worry! Simply click on the support icon in the "Add Car" section and provide detailed information about the model and version of your car. We will quickly add it to the list of available models.
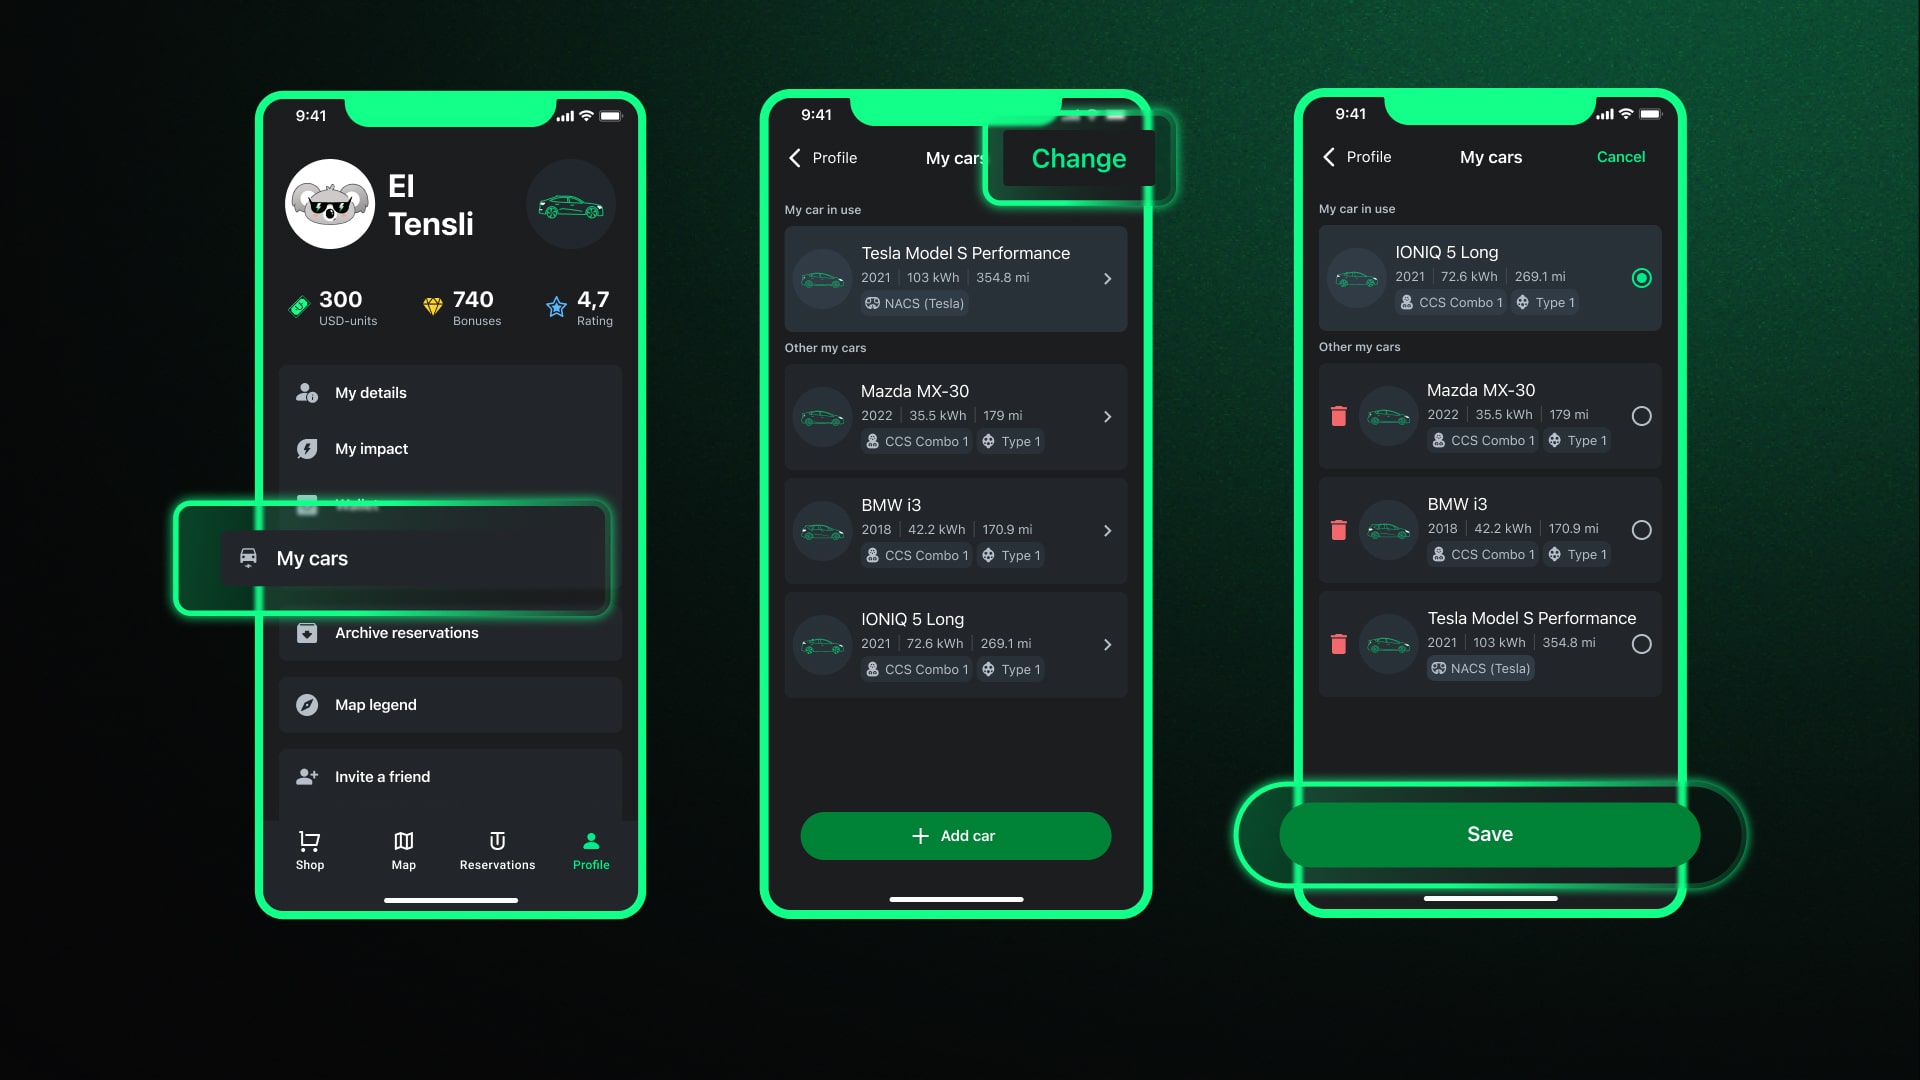
How to Set the Newly Added Car as a Priority?
- In the “My Cars” tab, in the upper right corner, press the “Change” button.
- Place the marker on the car you wish to make a priority.
- Press the “Save” button.
Managing Your Account Balance
Maintaining a balance in your GO TO-U account is essential for seamless charging sessions.
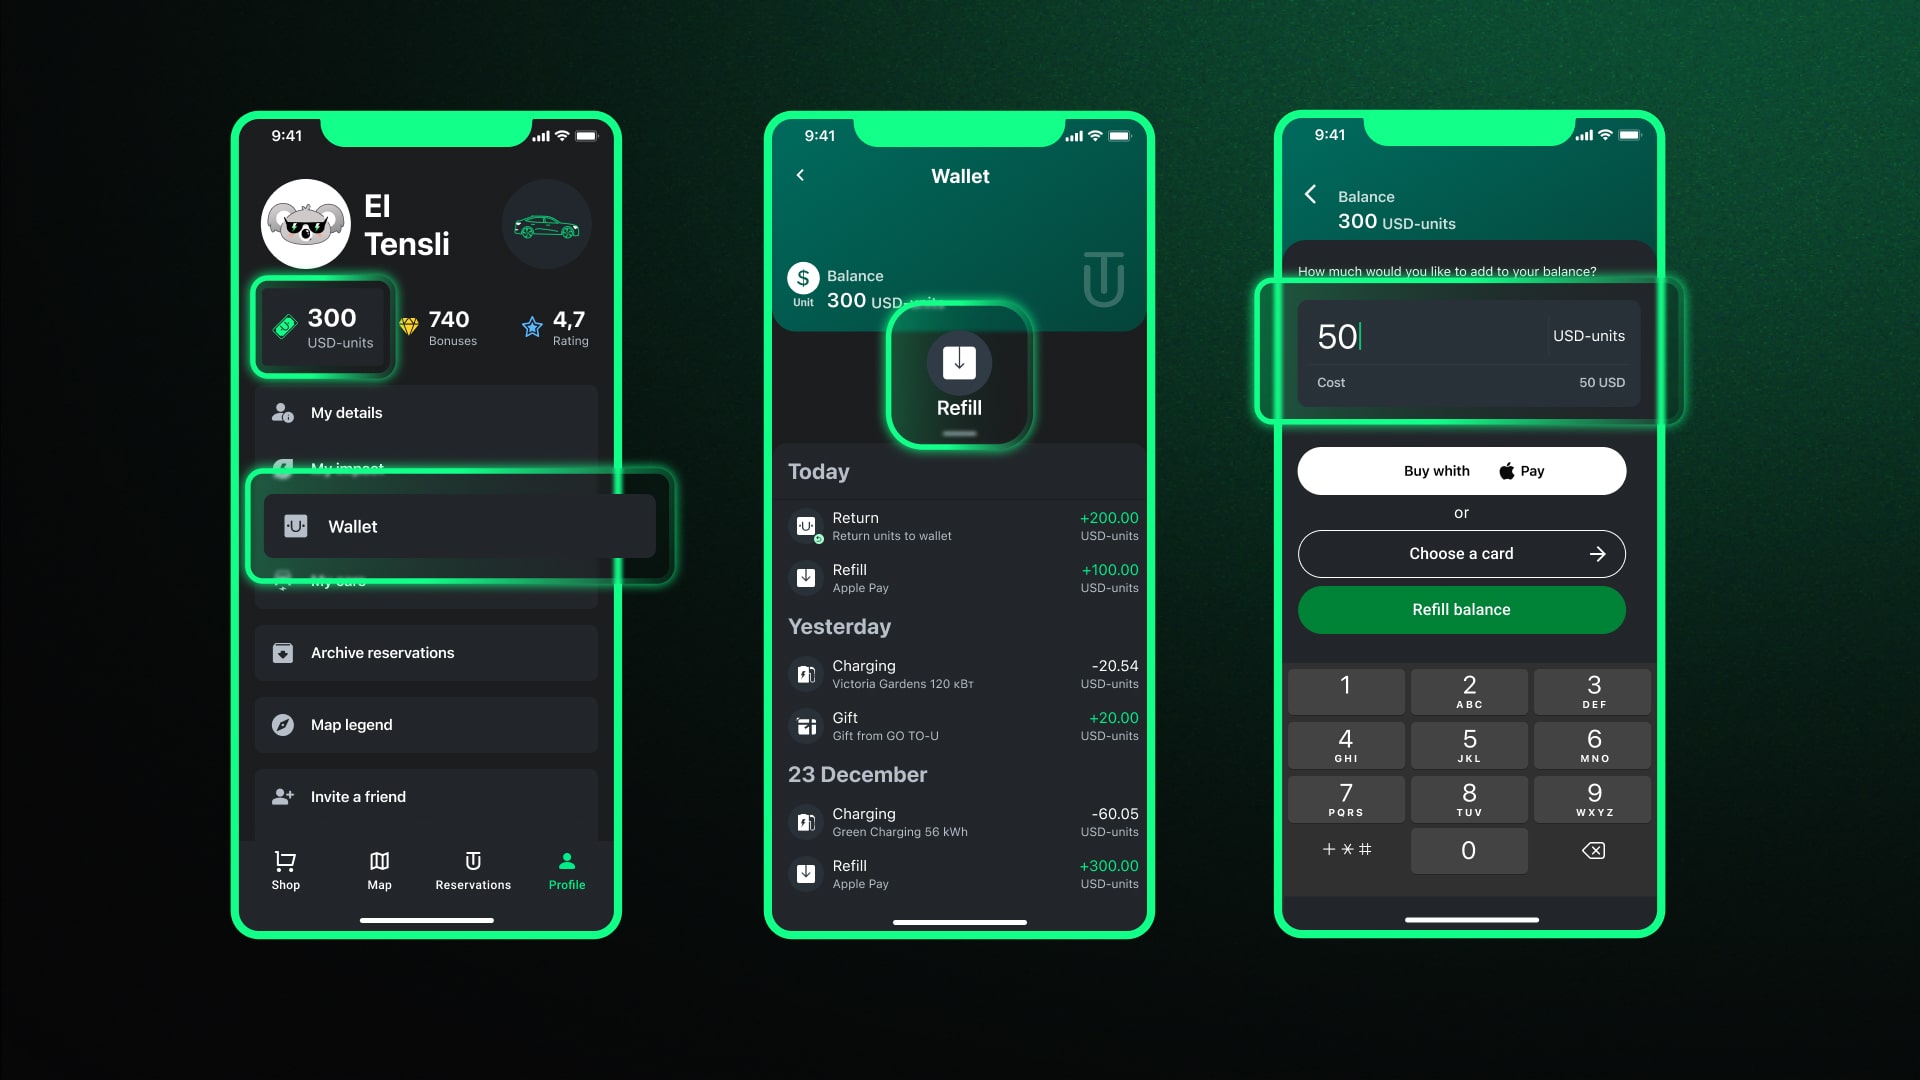
How to Top Up the Balance?
There are two primary methods to top up your balance:
- Tap the "banknote" icon in the "Profile" tab, enter the amount, and choose a payment method.
- Alternatively, select the "Wallet" item within the "Profile" tab and follow similar steps to add funds to your account.
The process is user-friendly, ensuring you can easily keep your balance positive for uninterrupted charging.
What to Do If You Forgot to Top Up Before Charging
If you've forgotten to top up your balance before charging, there's no need to worry. The app allows you to add funds at the start of a charging session, displaying the estimated charging cost for your convenience.
Reservation, Quick Start, and Monitoring
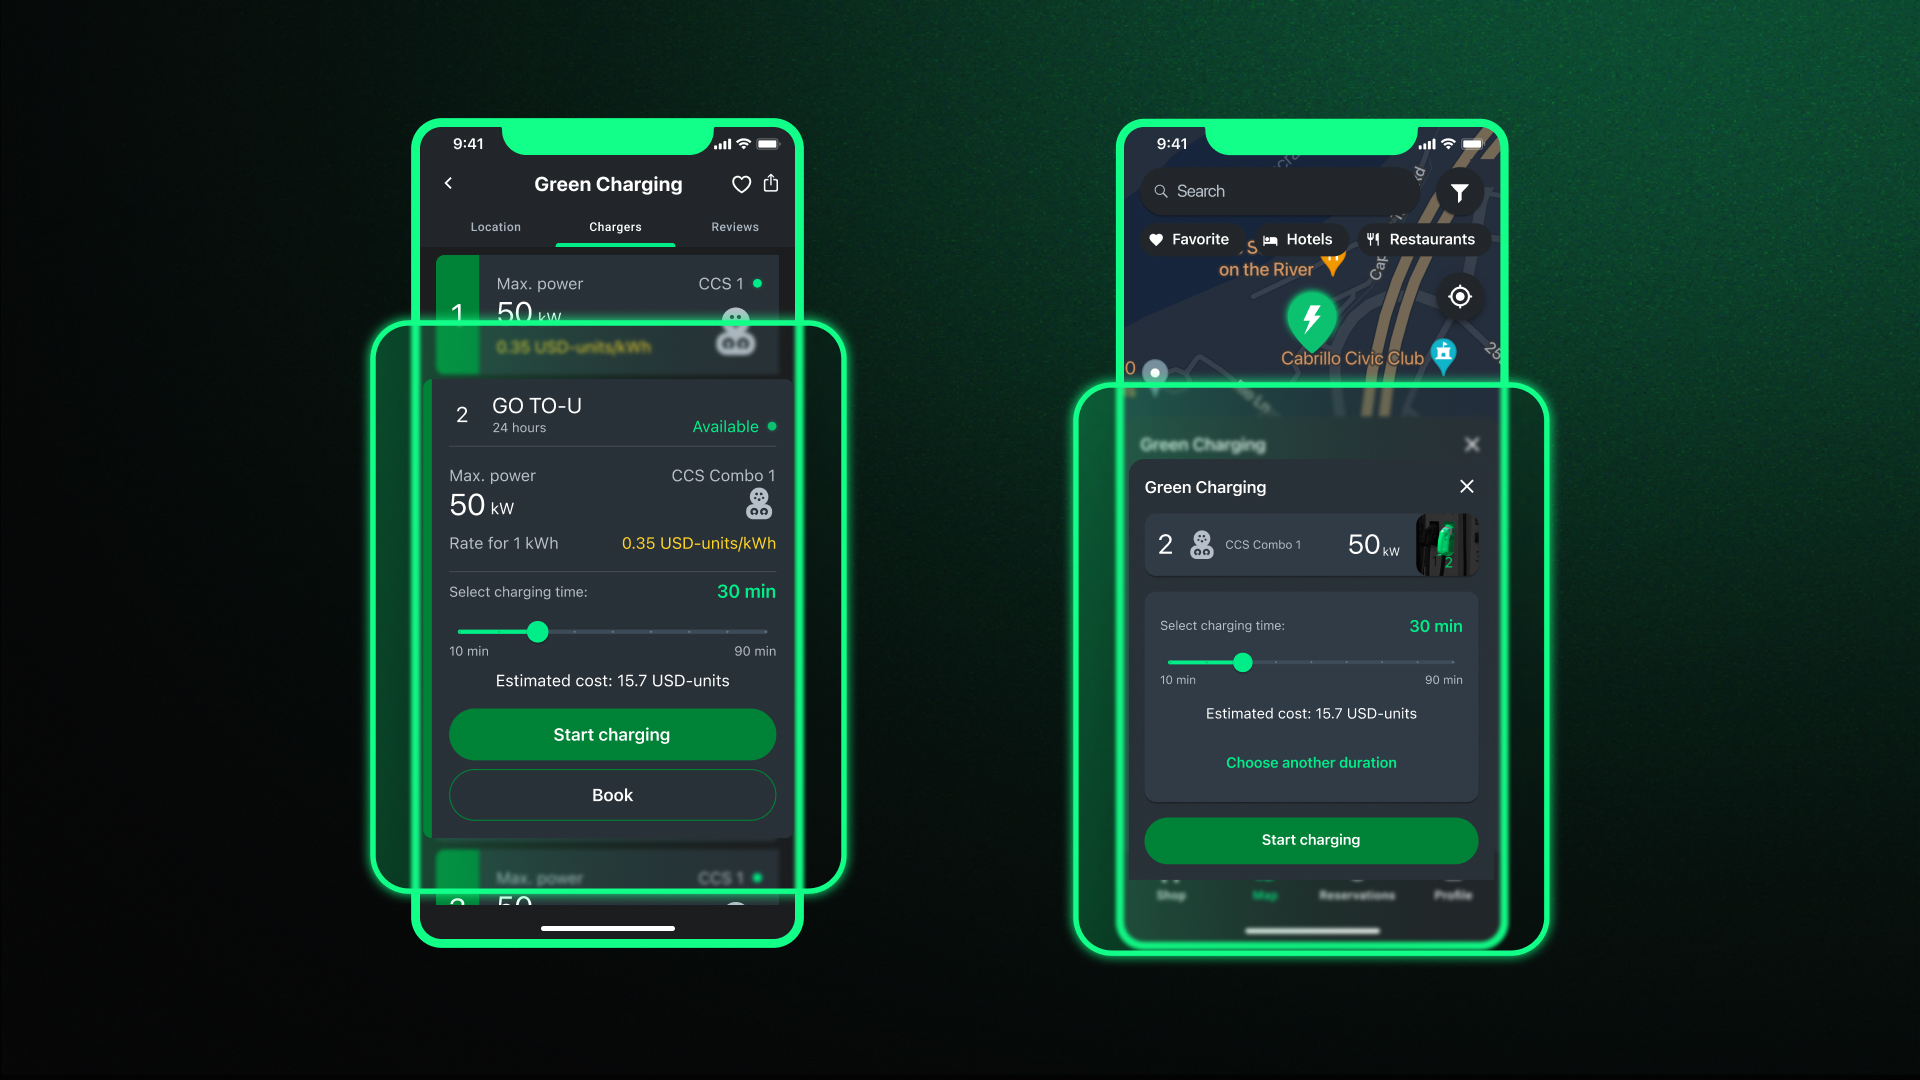
How to Reserve a Charging Station in the GO TO-U App?
- On the main screen, on the map or using the search window at the top, find the required charging location.
- Press the location card or the "Charge" button.
- Select the necessary charger, considering the power and connector type, if there are multiple options.
- Press the "Reserve" button.
- Choose the required time, day, and duration of charging, then press "Reserve".
Note: If the charging station is free or you have the necessary number of units on your balance, the reservation will be immediately confirmed. If the station is paid and there are not enough units for reservation, you need to top up your account, after which the station can be reserved.
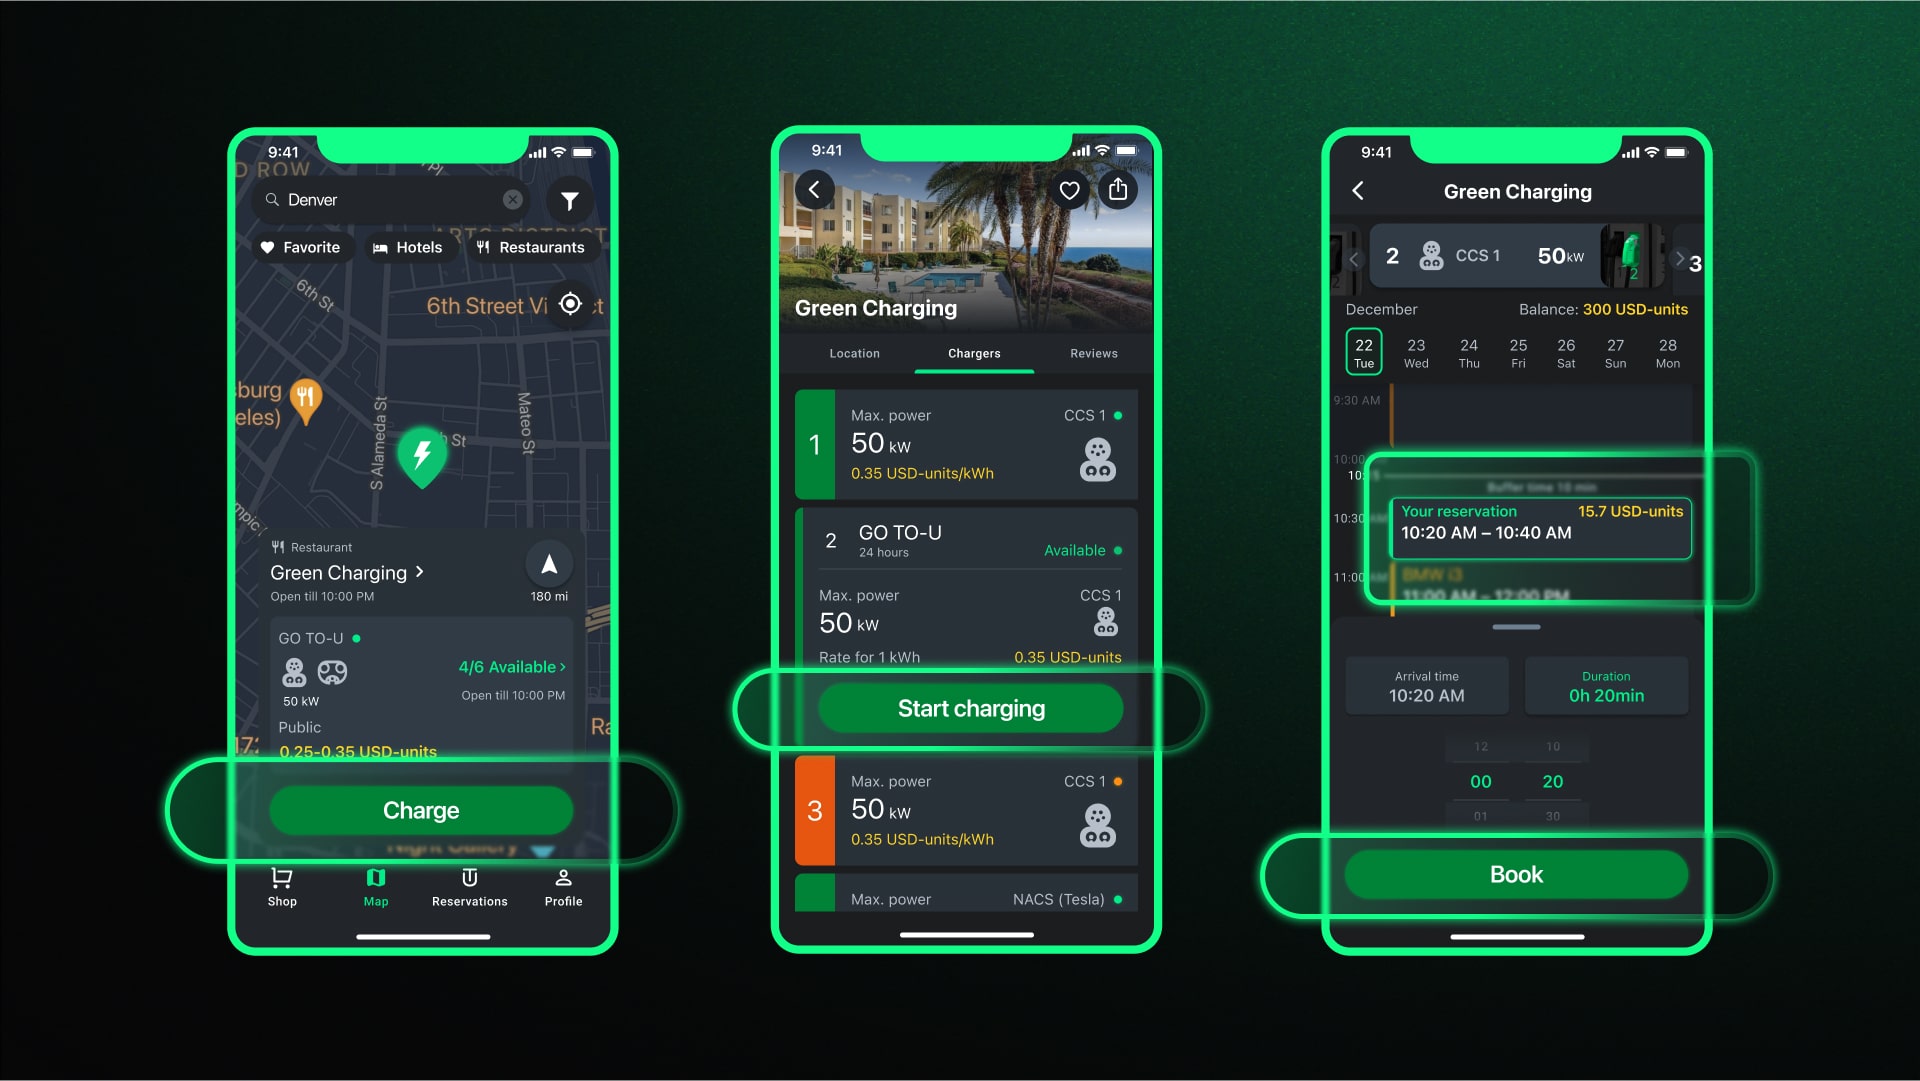
How to Start Charging in One Click?
Method 1
- On the main screen, on the map or through the search window at the top, select the required charging location.
- Press the location card or the "Charge" button.
- Choose the necessary charger (by power and connector type, if there are multiple options).
- Press the "Start Charging" button.
Method 2
- Connect the required connector to the car.
- Open the app, and we will automatically suggest starting charging on the connected connector to your electric vehicle.
- Press the "Start Charging" button on the map screen.
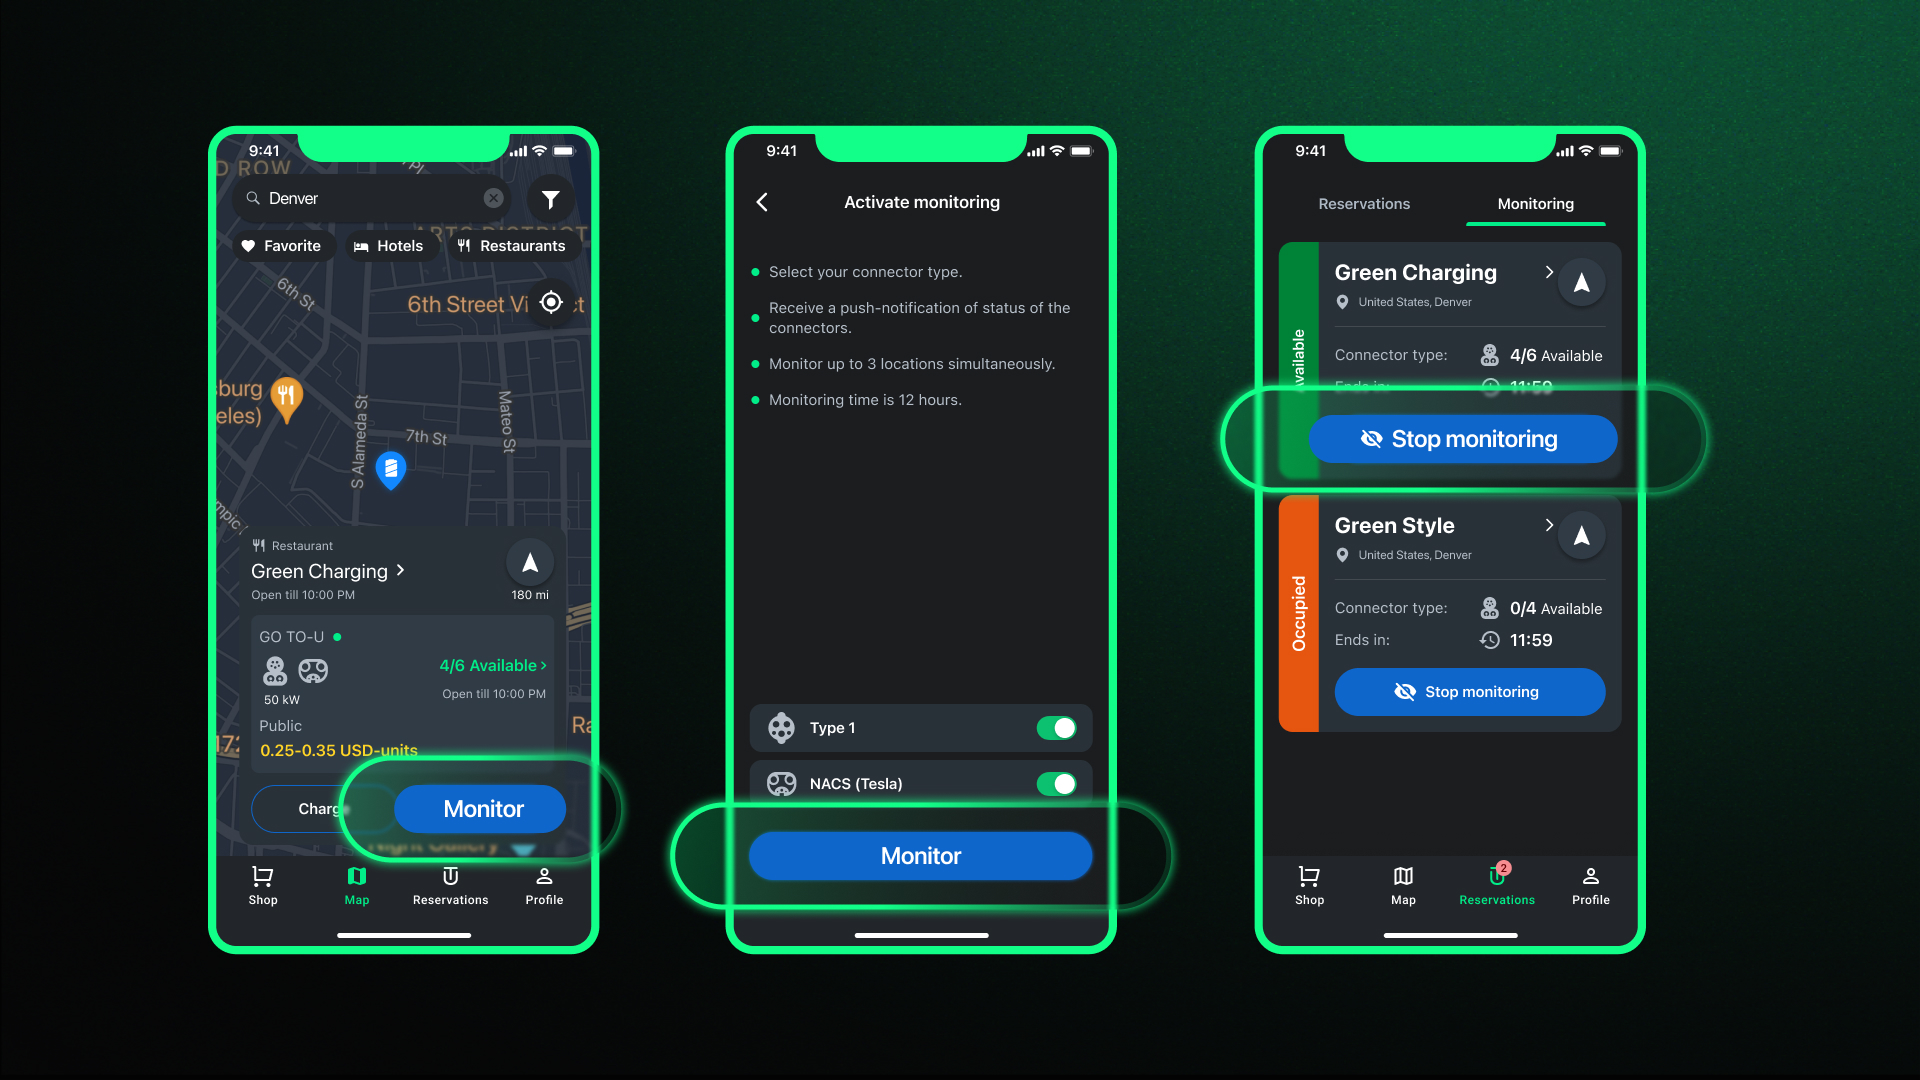
How to Monitor Charging Stations?
Some charging stations connected to the roaming platform in our app have the "Active Monitoring" feature. This function allows you to monitor the status of the charging station in real-time. When you activate monitoring for a station, you will be notified about the connector's status (free or occupied). To use this feature, follow these steps:
- Find the required charging location on the main screen using the map or search window at the top.
- Press the location card or the "Charge" button.
- Choose the required connector (by power and connector type, if there are multiple options).
- Press the "Monitor" button.
Note: You can monitor up to 3 stations simultaneously, and the maximum monitoring time for one charge is 12 hours.
How to Cancel Active Monitoring?
- On the main screen, at the bottom, press the "Reservations" tab.
- Select the "Active Monitoring" tab.
- Press the "Stop Active Monitoring" button.
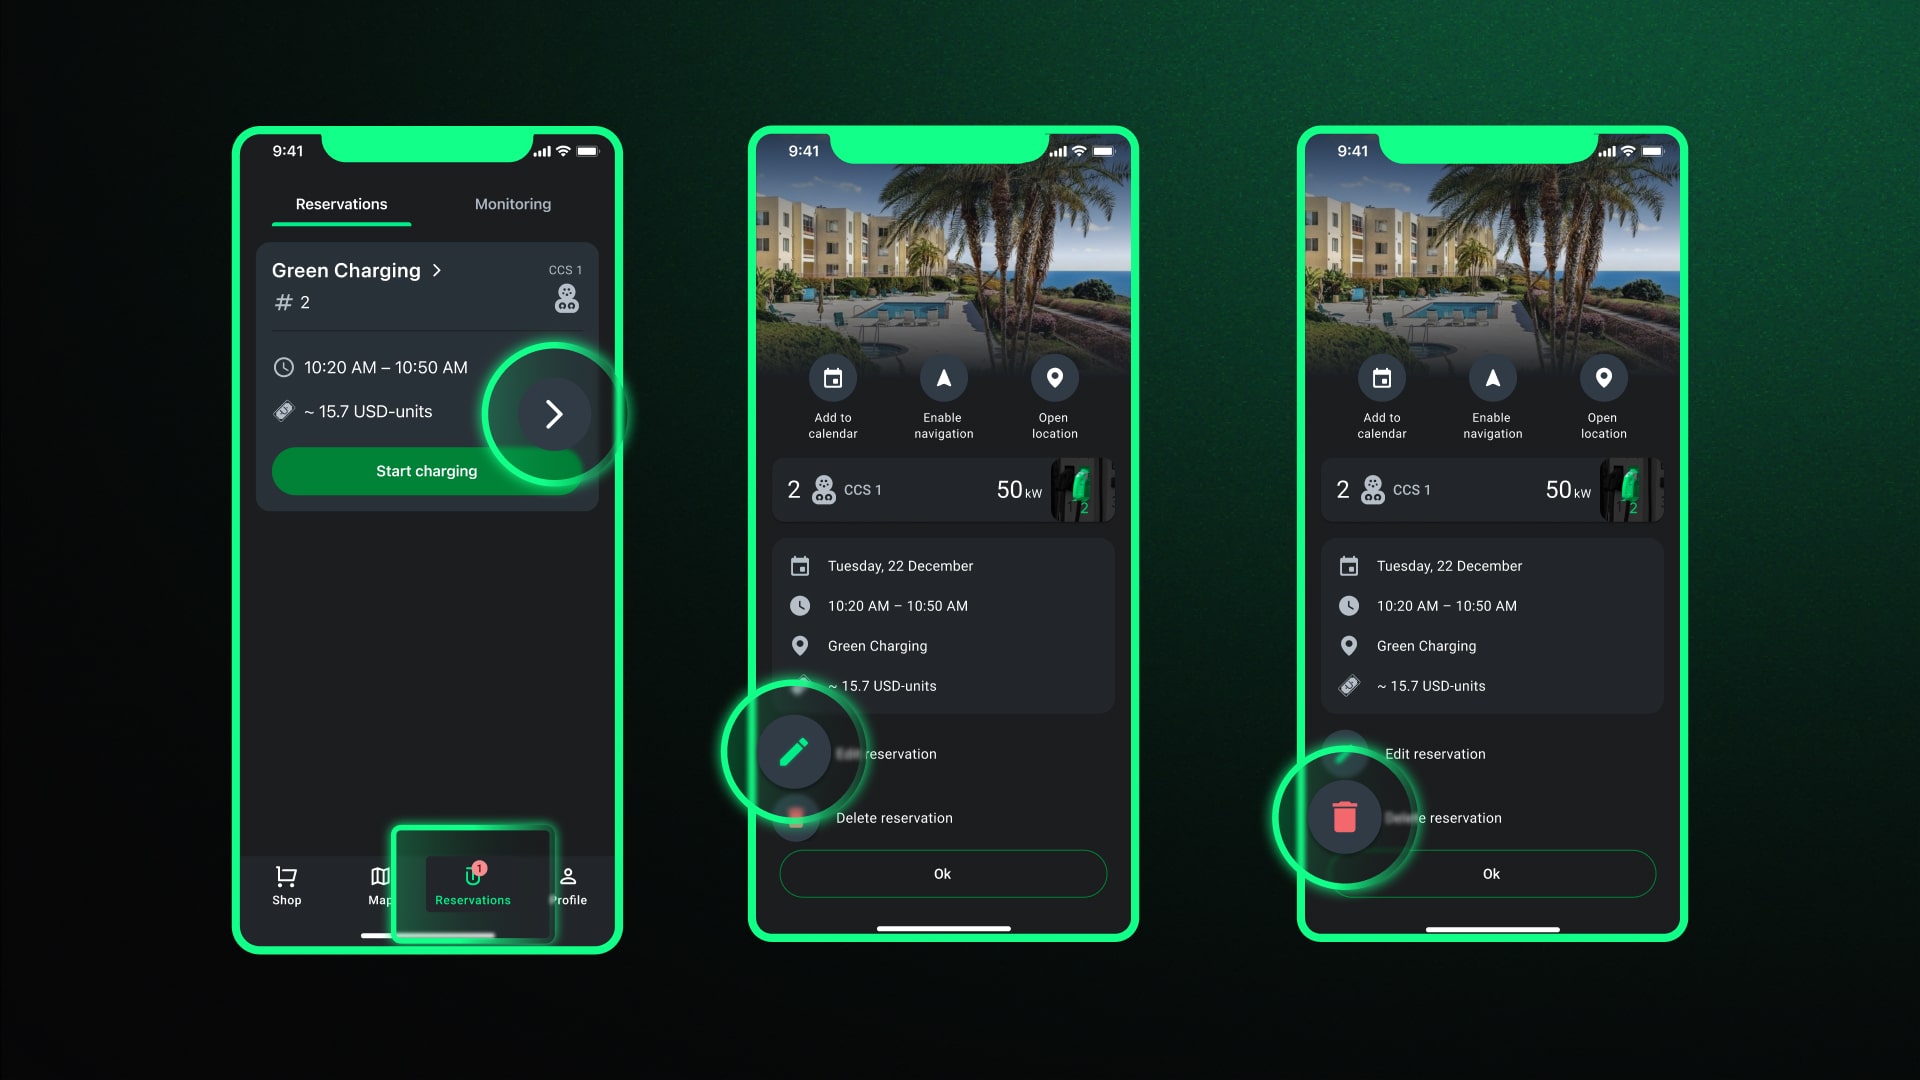
How to Edit and Cancel a Reservation?
- On the main screen, at the bottom, press the "Reservations" tab.
- Select the "Reservations" tab.
- Press the "Edit Reservation" or "Delete Reservation" button.
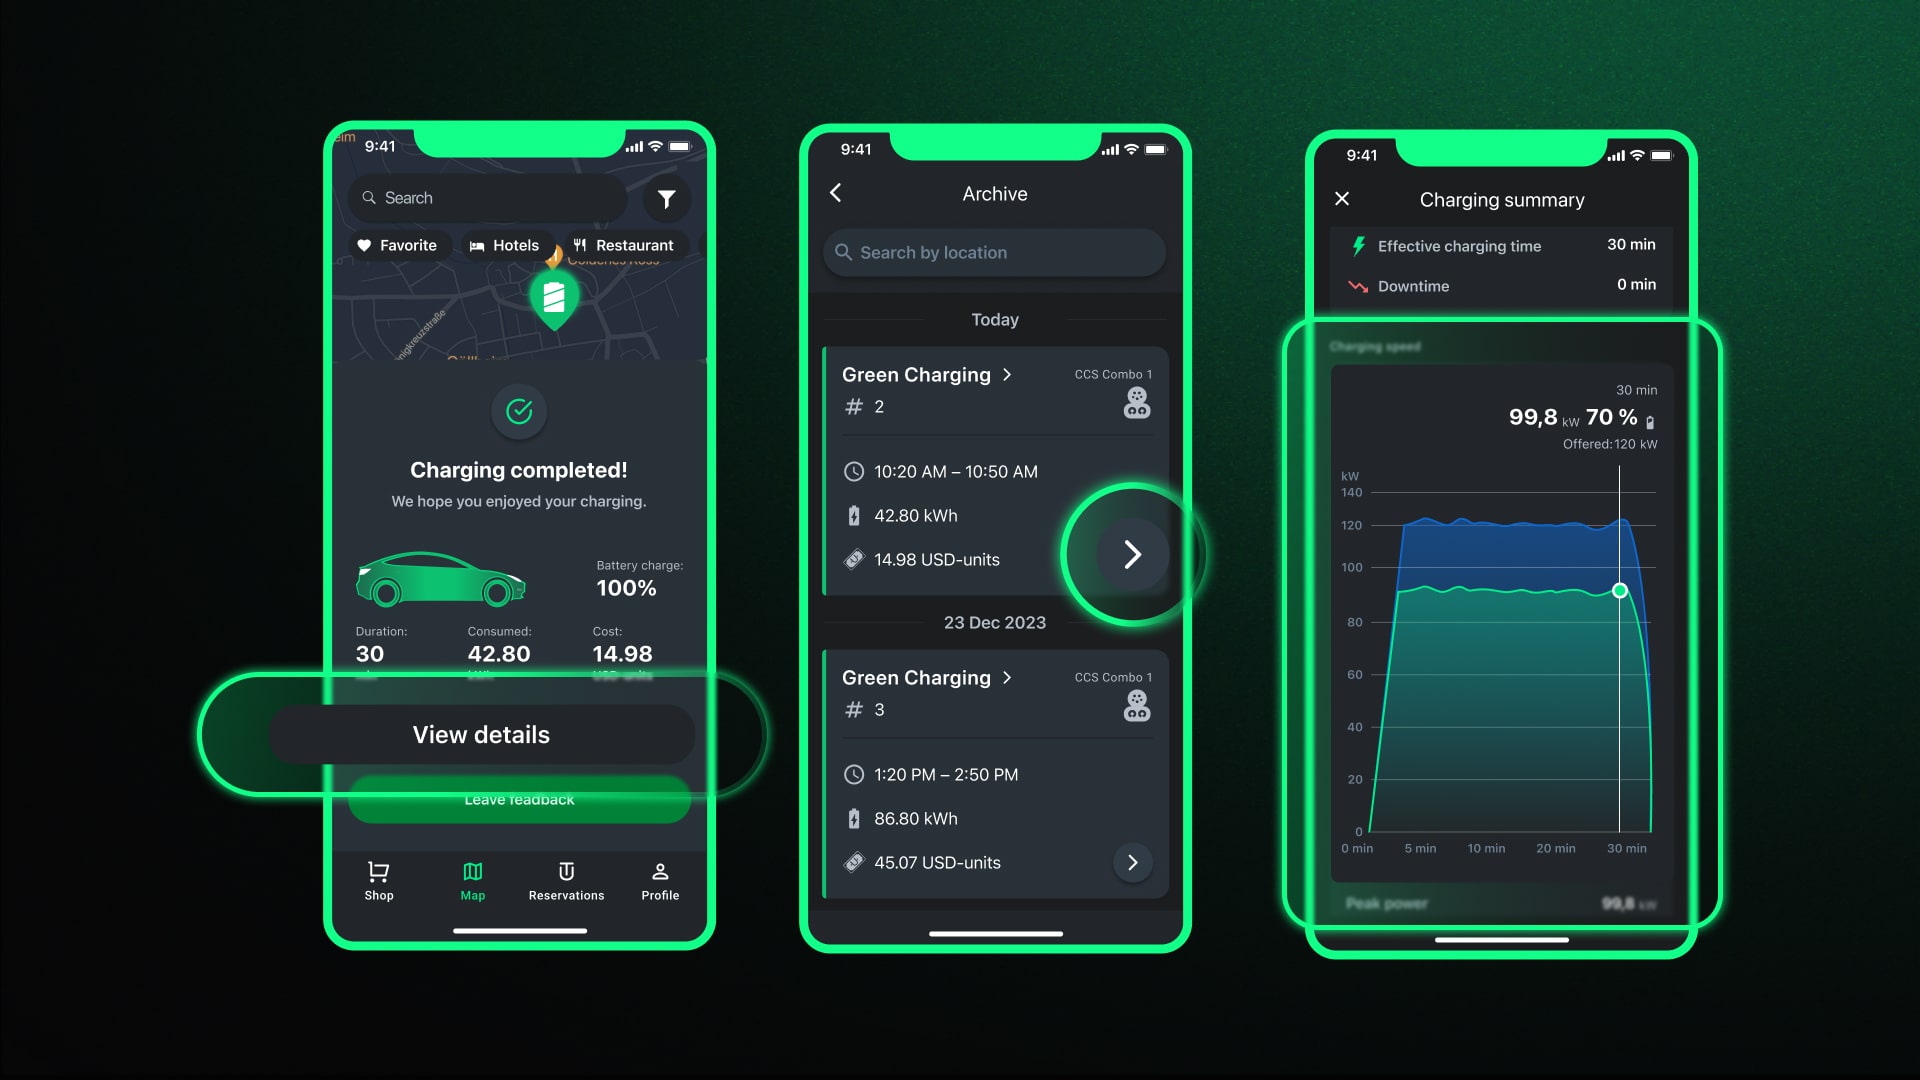
How to Review the Charging Summary?
The “Charging Summary” feature allows you to review the summaries of charging sessions:
- Immediately after the end of a charging session.
- In the reservation history.
To review it in the reservation history, perform the following actions:
- Open the "Profile" tab and go to the "Reservation Archive" tab.
- Select the required charging session and press the left arrow button in the form of a circle on the charging session card to view charging details.
Feedback
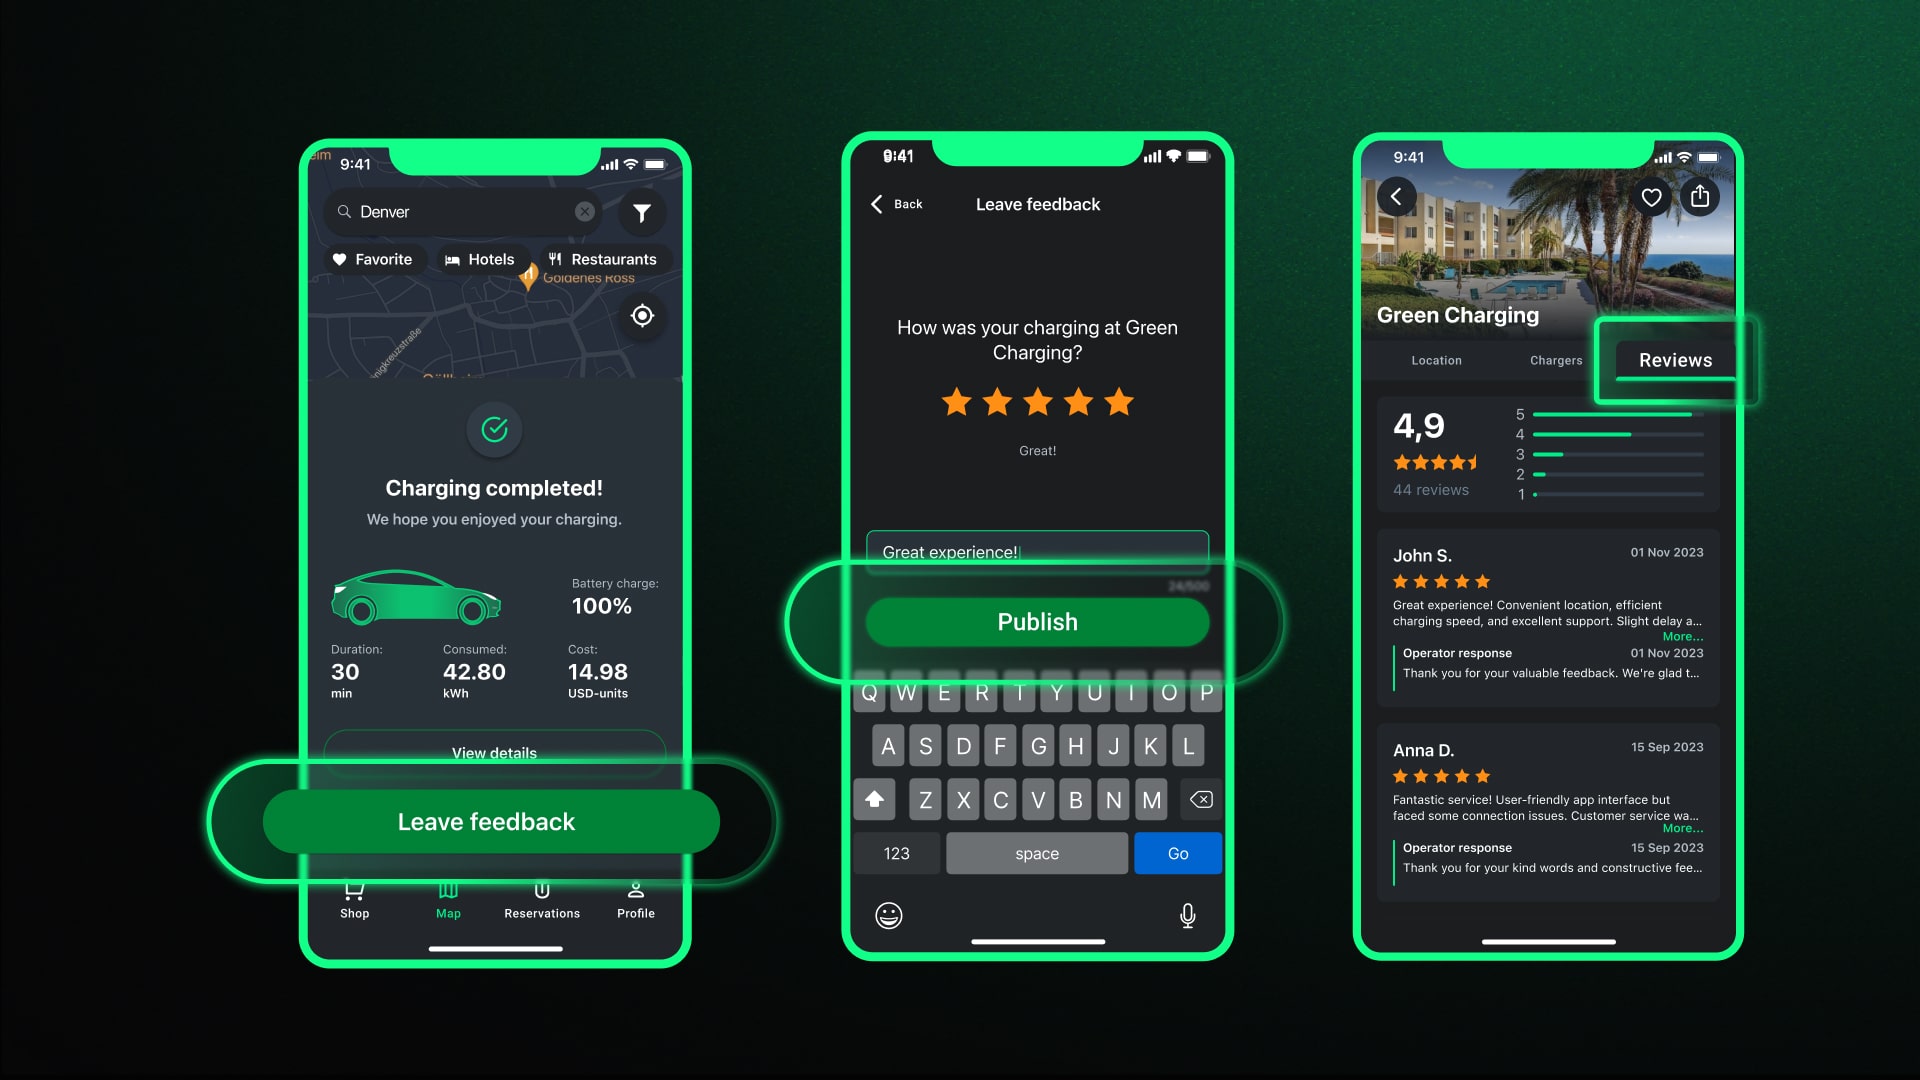
How to View Reviews?
- Find the charging station on the main screen using the map or the search function.
- Tap the location card or the “Charge” button.
- Select the “Reviews” tab, located in the upper right corner of the screen.
- Browse through the reviews to gauge the charging station's reliability and user experience.
How to Leave a review / reviews?
- At the end of your charging session, the app will prompt you to leave feedback.
- You can rate the charging station and write a few words about your experience.
Note: You have the option to delete or edit your review later if you change your mind or if there was a mistake in your initial feedback.
My Profile
Your profile in the GO TO-U app is where you can manage your personal data, contact support, and view your environmental impact.
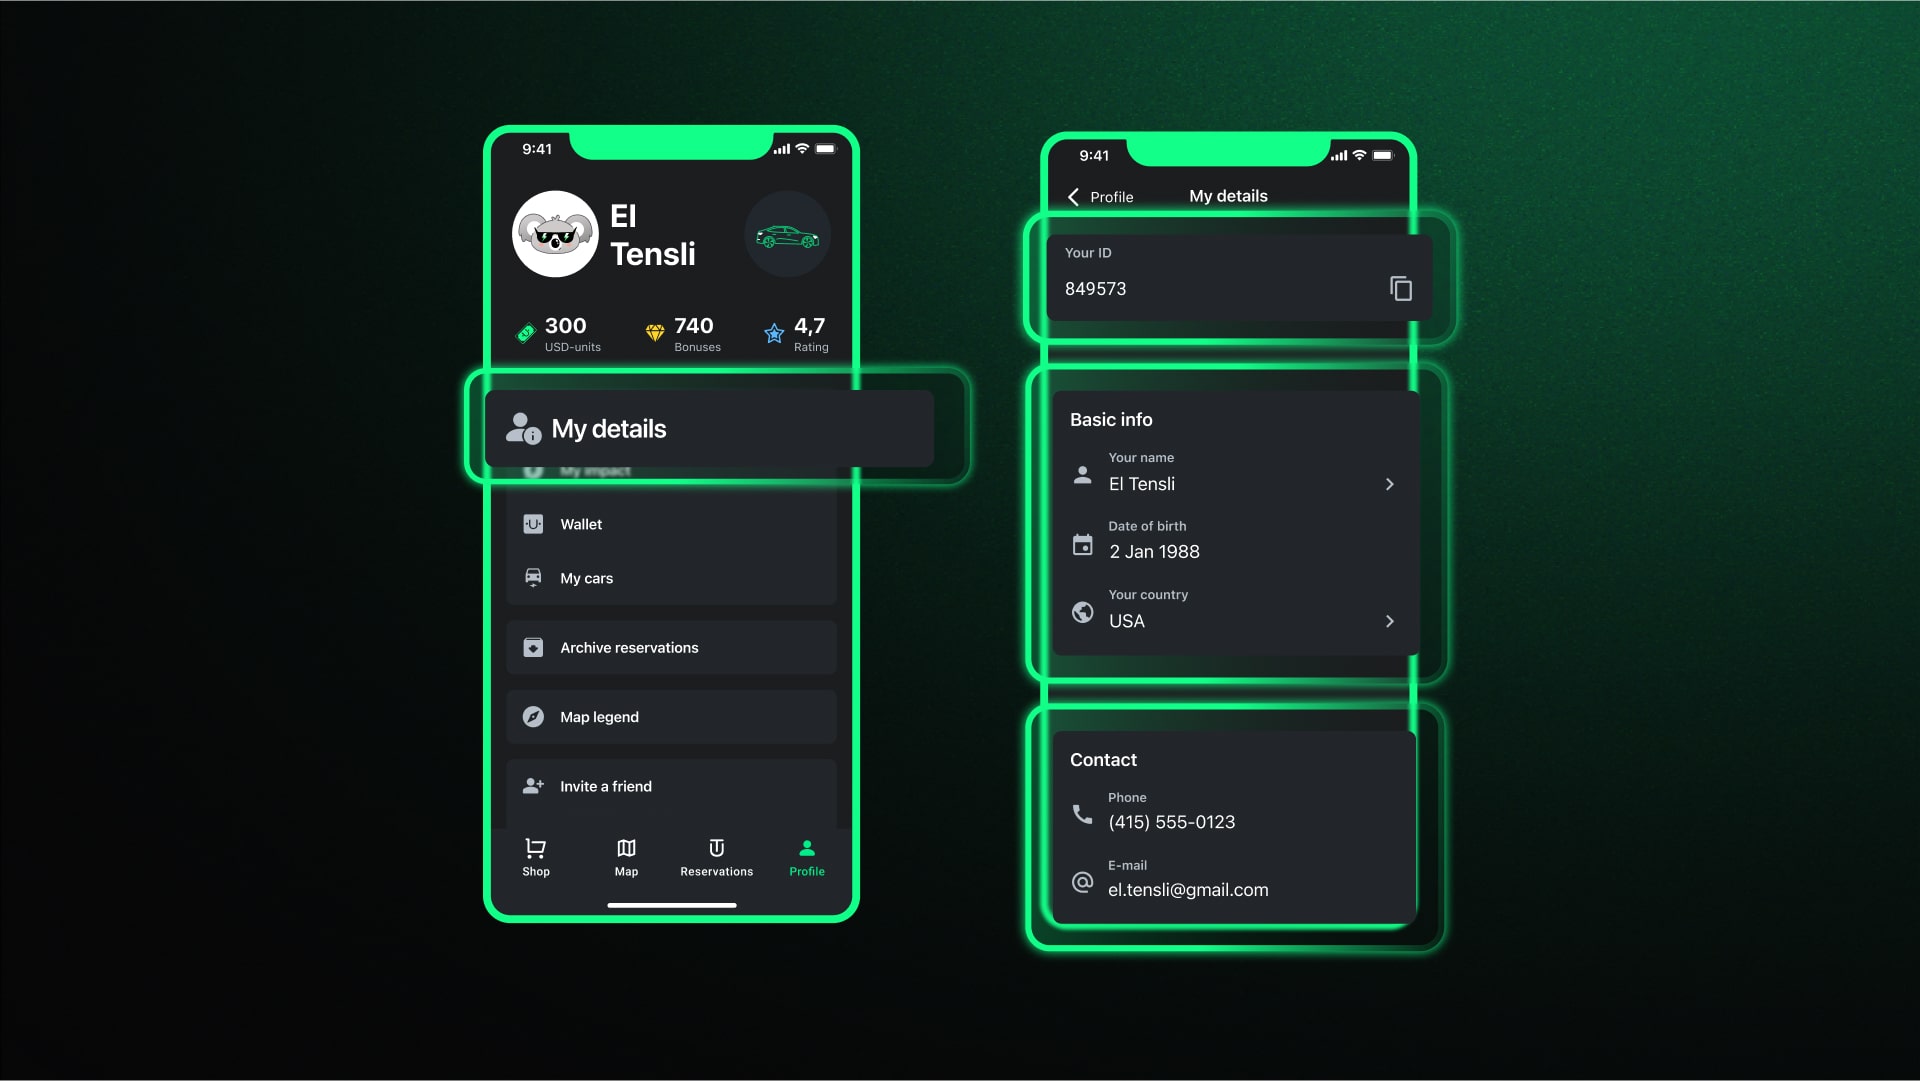
Where Can I See My ID?
Your ID is a unique identifier within the GO TO-U app. To find it:
- Tap the “Profile” tab on the main screen.
- Select the “My Data” option.
- Your ID will be displayed at the top of the list.
How to Make Changes to Personal Data?
- Open the “Profile” tab on the main screen.
- Enter the new details in the “General Information” and “Contact Data” tabs.
Note: Some information, such as your date of birth and phone number, cannot be edited.
How to Contact Support?
GO TO-U offers 24/7 support to assist with any issues or questions:
- Go to the “Profile” tab on the main screen.
- Tap on the “24/7 Support” option.
- Choose your preferred messenger service to contact the support team.
- Send your message, and the support team will assist you promptly.
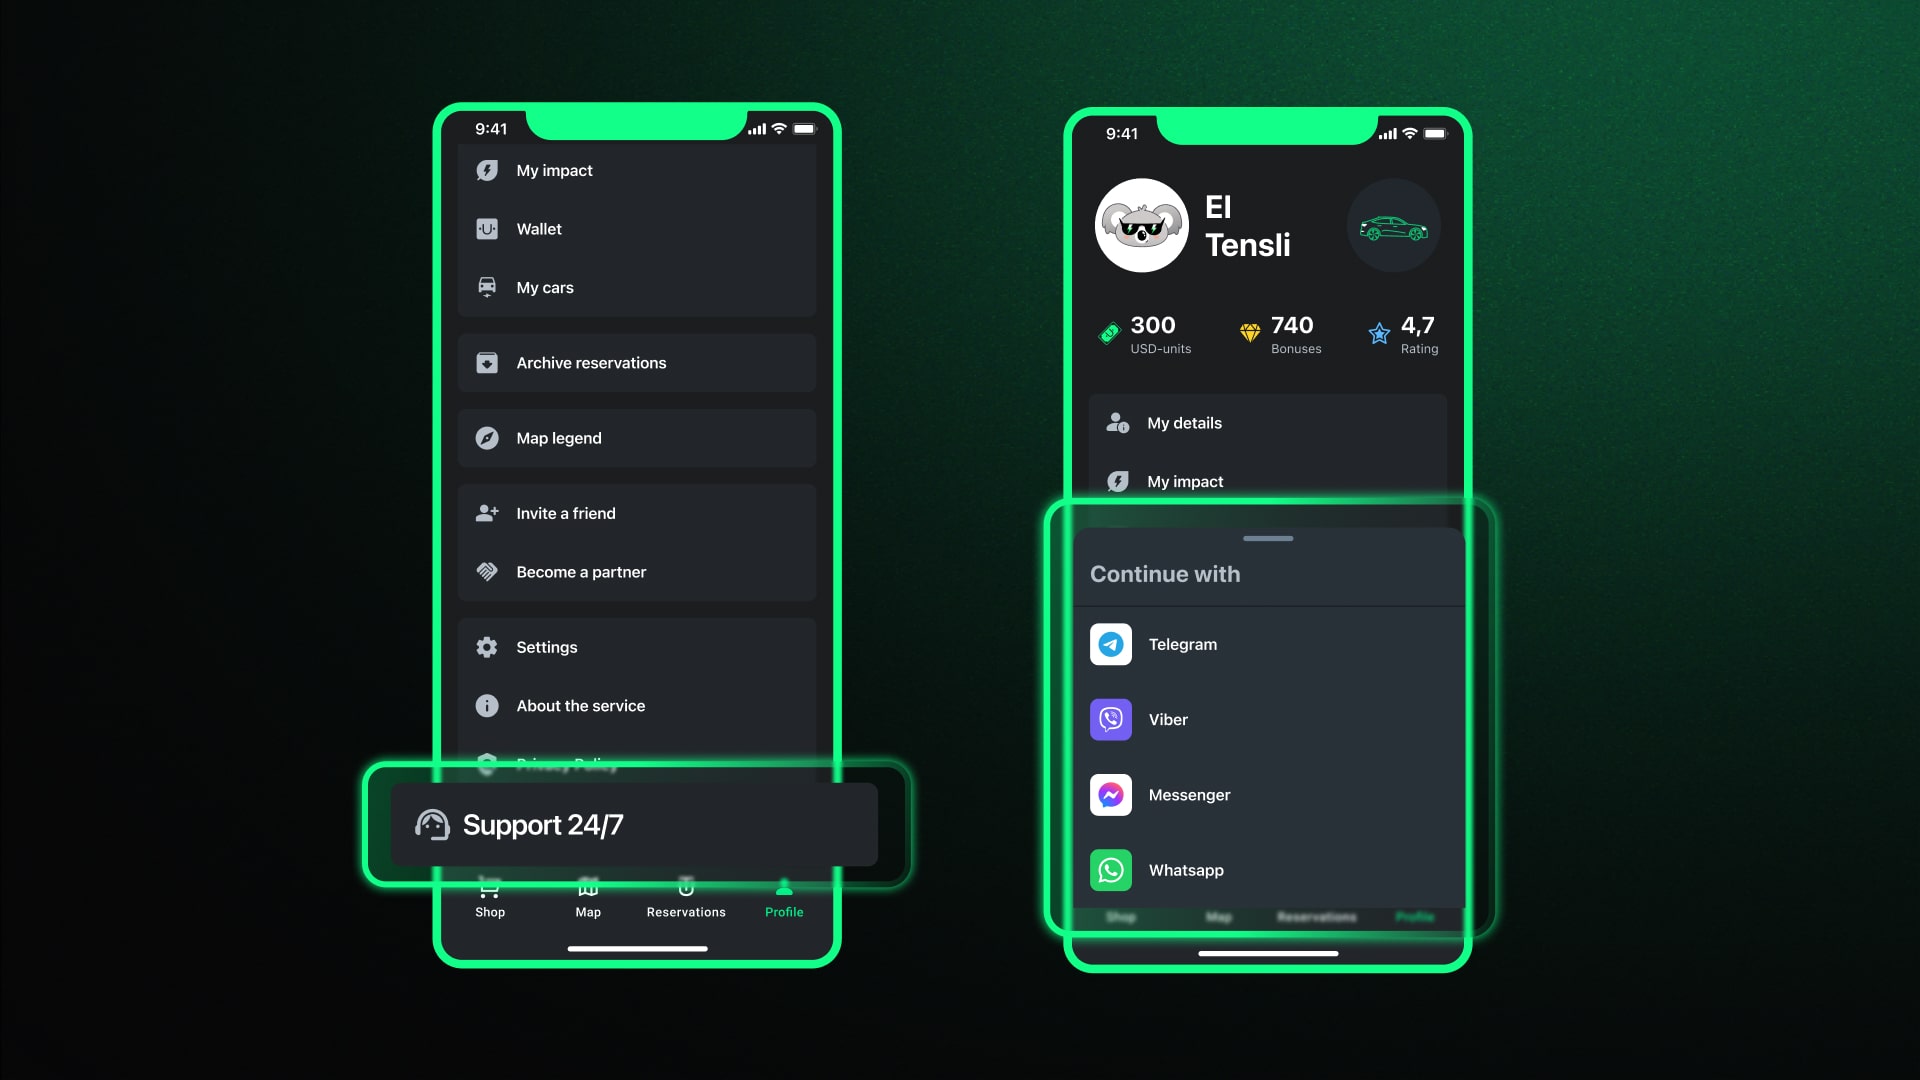
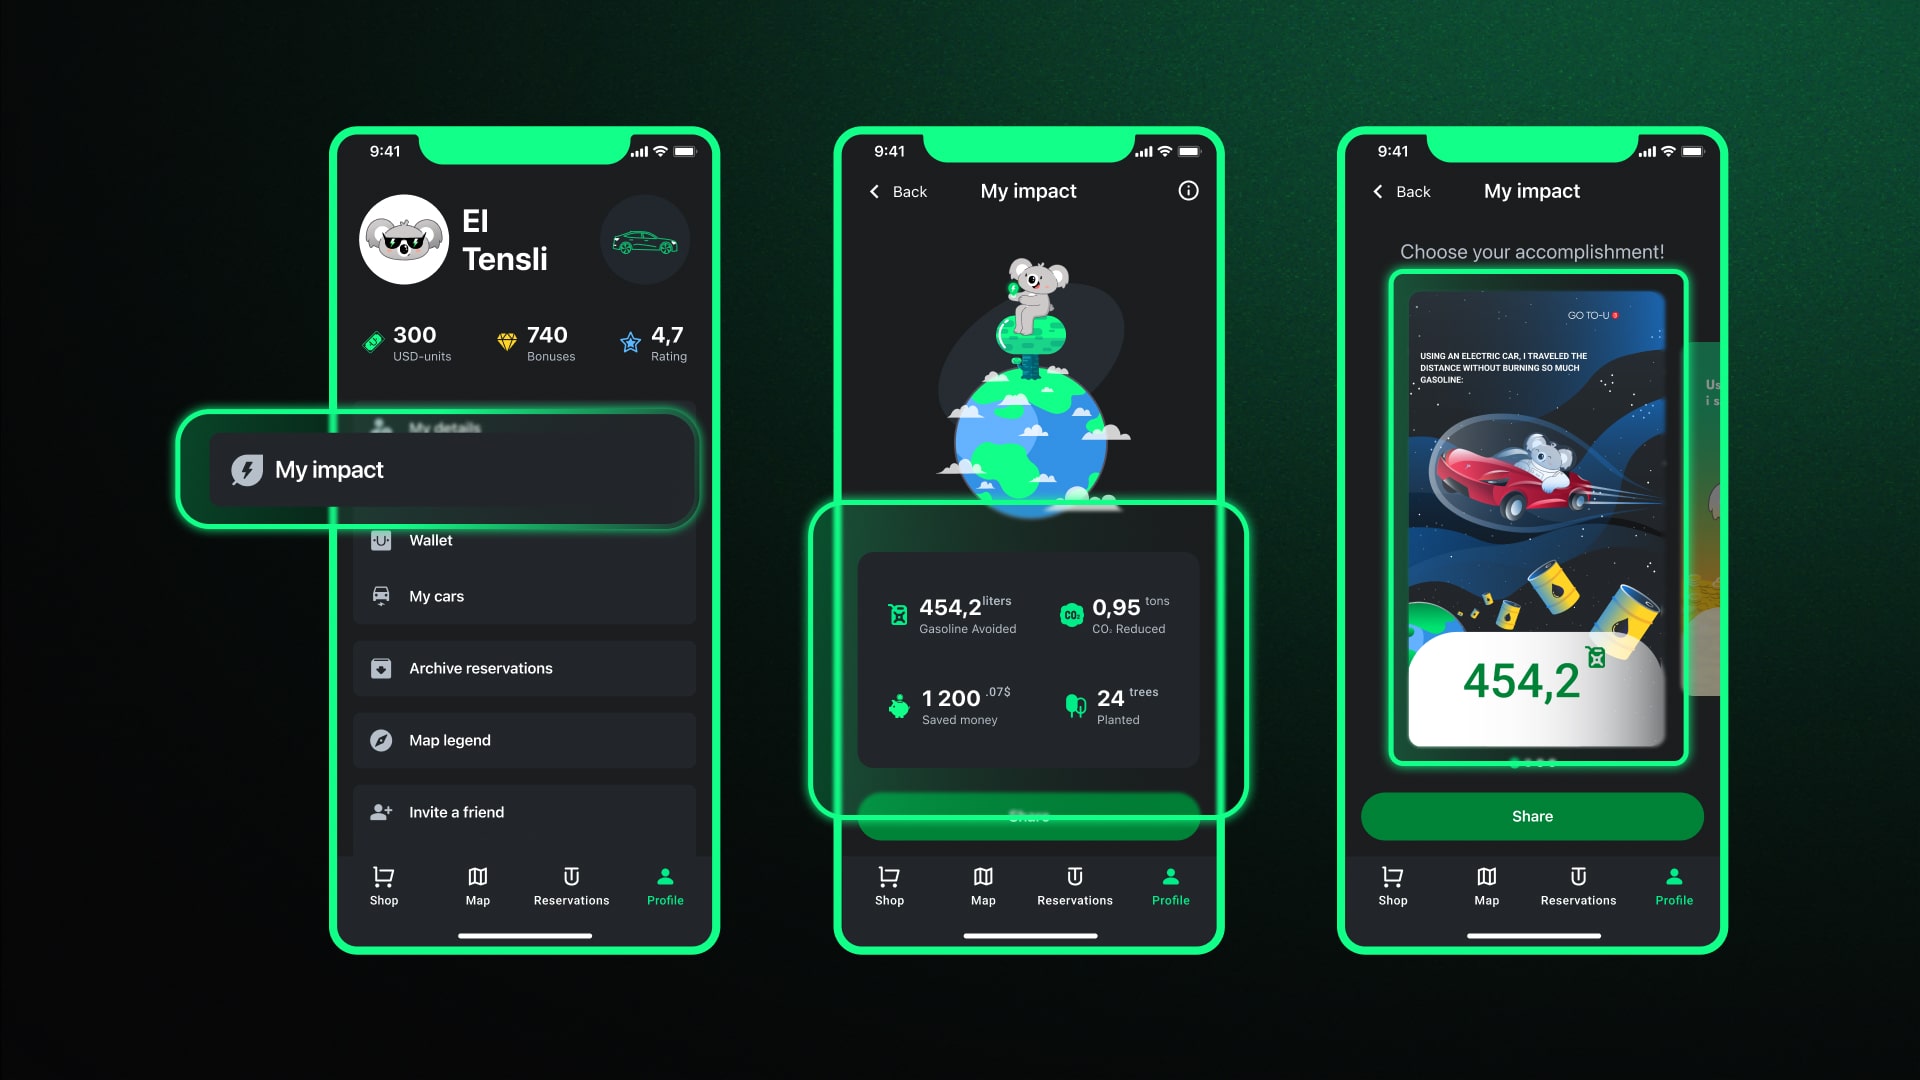
Where Can I View My Impact from Using an Electric Vehicle?
- Navigate to the “Profile” tab on the main screen.
- Click on the “My Impact” tab to view statistics and data on your contribution to reducing emissions.
Note: In the “Profile” tab, you can also view the reservation archive, invite a friend by sending an invitation, and apply for a partnership.
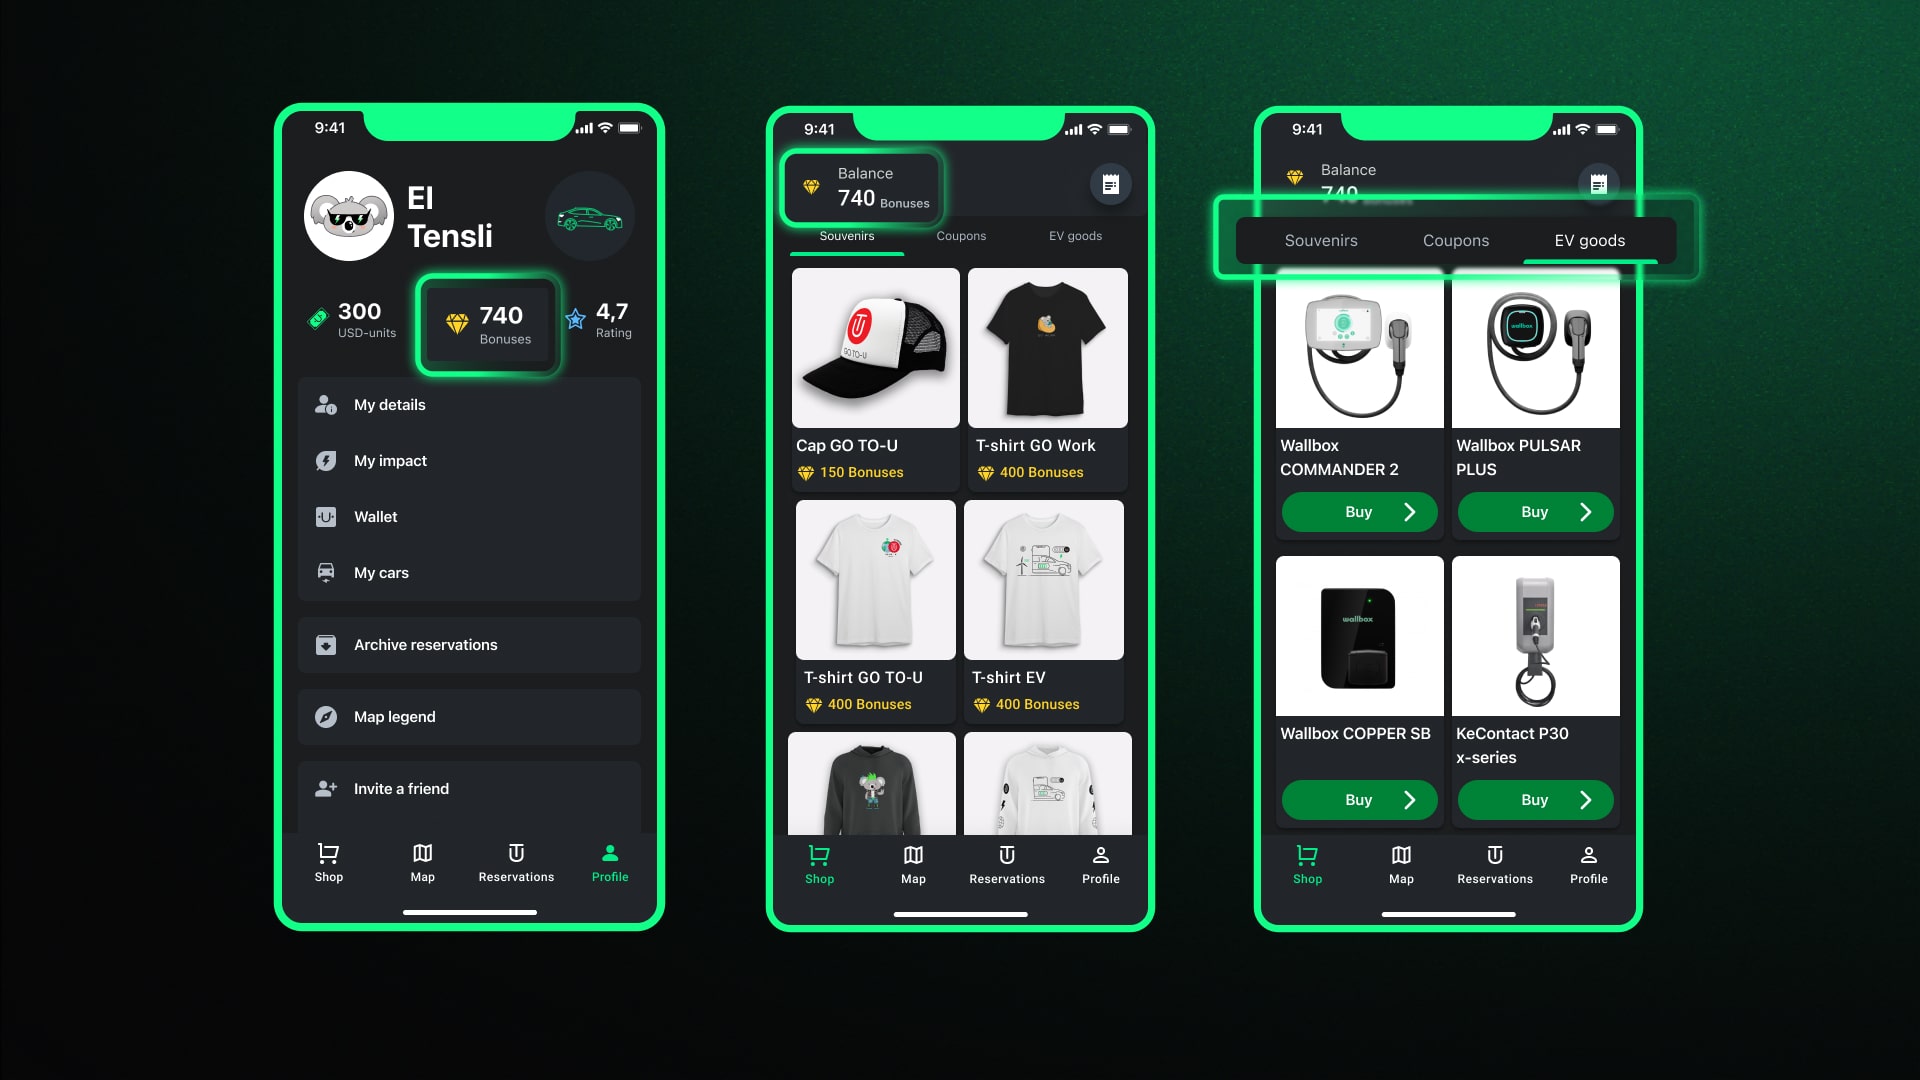
Bonuses and Product Shop
As a way of thanking users for their activity, GO TO-U offers a bonus system where users can receive bonuses for activities such as selfie check-ins or leaving feedback. These points can be exchanged for branded merchandise or coupon discounts.
How to View Your Bonus Balance?
- Open the “Profile” or “Shop” tab.
- Your bonuses will be displayed with a “Diamond” icon, indicating your balance.
How to Exchange Bonuses for Merch or Coupons?
- Navigate to the “Shop” tab.
- Choose between the “Souvenirs” or “Coupons” tab.
- Select the item you want and exchange it using your bonuses.
Additionally, the "Shop" section contains a category for "EV Goods," where you can find essential items like charging stations and cables. To buy a product:
- Choose the item you need and tap “Buy.”
- You'll be redirected to the GO TO-U website, where you can add the product to your cart and complete the purchase.
Note: You can also review your past orders in the "My Orders" tab, accessible through the "Check" icon in the "Shop" tab.
This guide is designed to help you navigate the GO TO-U app with ease, enhancing your EV charging experience. As the app evolves with new updates and features, we'll keep this guide current to reflect those changes. Remember, our support team is always ready to assist you via Telegram, Viber, Messenger, or WhatsApp.